Creating GitHub Pull Requests
This article explains how to contribute to Gentoo by creating pull requests on GitHub.
How to make a pull request
Making a pull request is explained at length in the various how-tos put together by the GitHub folks, here are two must-read how-tos:
Currently new packages are added via proxy-maint project and the current manpower isn't enough to handle the flood of new packages. We recommend contributing to GURU overlay instead for now, where interesting and popular packages are pulled to ::gentoo. Read more: https://archives.gentoo.org/gentoo-proxy-maint/message/44f7712fb49850288cd840c3541f6d7e
Configuration
Repository's remote configuration
Variant a: User configures a local repository
Clone the github mirror of the Gentoo repository under the remote name "upstream" into the path/to/save directory (substitute path/to/save with the directory of choice):
user $git clone -o upstream https://github.com/gentoo/gentoo.git path/to/saveStep into the new directory, then view the 'remote' settings
user $cd $_user $git remote -vupstream https://github.com/gentoo/gentoo.git (fetch) upstream https://github.com/gentoo/gentoo.git (push)
Fork the Gentoo repository on GitHub
Add it under the remote name "github" to your local repository.
user $git remote add github <UrlOfYourFork.git>Verify the repository's remote settings
user $git remote -vgithub https://github.com/<github user>/gentoo (fetch) github https://github.com/<github user>/gentoo (push) upstream https://github.com/gentoo/gentoo.git (fetch) upstream https://github.com/gentoo/gentoo.git (push)
Variant b: Using the git repository as the ::gentoo repository
This setup is not fully functional since the plain developer repository as obtained from github lacks the metadata generated for the official ::gentoo repository.
root #mkdir /etc/portage/repos.conf/Add the following to the file:
/etc/portage/repos.conf/gentoo.conf[gentoo]
location = /var/db/repos/gentoo
sync-type = git
sync-uri = https://github.com/gentoo/gentoo.git
auto-sync = yes
sync-user = portage:portage
Add the following, substitute <dev_user_name> with your username as appropriate in the script below.
/etc/portage/postsync.d/99-user-dev-perms#!/bin/bash
DEV_USER_NAME=<dev_user_name>
find /var/db/repos/gentoo/ -type d -exec setfacl -m u:$DEV_USER_NAME:rwx {} \;
find /var/db/repos/gentoo/ -type f -exec setfacl -m u:$DEV_USER_NAME:rw {} \;
find /var/db/repos/gentoo/.git -type d -exec setfacl -m u:$DEV_USER_NAME:rwx {} \;
find /var/db/repos/gentoo/.git -type f -exec setfacl -m u:$DEV_USER_NAME:rw {} \;
root #chmod +x /etc/portage/postsync.d/99-user-dev-permsThen sync the repository.
root #emerge --syncFork the Gentoo repository on GitHub
Add it under the remote name "github" to your local repository.
user $cd /var/db/repos/gentoo
user $git remote add github <UrlOfYourFork.git>
Repository's user configuration
Configure git to use the target key for code signing and to properly sign-off all your commits (a more detailed description of how to create the signingkey is given in the next section):
user $git config --local user.name "Your Full Name"
user $git config --local user.email "example@domain.tld"
user $git config --local user.signingkey KEY-FINGERPRINT
user $git config --local commit.gpgsign 1
Add helpful optional settings:
user $git config --local pull.ff only
user $git config --local pull.rebase merges
user $git config --local push.default simple
user $git config --local push.gpgsign 0
Verify the settings:
user $git config --local --listGPG configuration
Add the following to gpg.conf:
~/.gnupg/gpg.confGeneral GPG Setupkeyserver hkps://keys.gentoo.org
keyserver-options no-honor-keyserver-url
cert-digest-algo SHA512
default-preference-list SHA512 SHA384 SHA256 SHA224 AES256 AES192 AES CAST5 ZLIB BZIP2 ZIP Uncompressed
Now to generate the key:
user $gpg --full-generate-key- Select the algorithm.
- Set the key size.
- Specify how long the key should be valid (No more than 5 years).
- Confirm the information is correct.
- Set your name.
- Set your passphrase, and confirm it.
- It might take some time if you've chosen a high bit length key.
Retrieve your GPG public keyID via the following command:
user $gpg --list-public-keys --keyid-format 0xlong example@domain.tldThe key id is the portion after the <algorithm>/ on the line beginning with pub as shown in bold below. If you have more than one key with the specified UID you will need to select the correct key yourself from the list of returned keys.
pub rsa4096/KEY-FINGERPRINT
Upload your key to the keyserver:
user $gpg --keyserver keys.openpgp.org --send-key KEY-FINGERPRINTUsage
Step 1: User updates the local repository
user $git checkout masteruser $git pull upstream masterStep 2: User changes a package
Say you are making changes to package app-foo/bar. Create a local branch with the changes:
user $git checkout -b <branch name> masterMake the changes and make sure to run pkgcheck to check for basic errors:
user $git add .
user $pkgdev manifest
user $pkgcheck scan --net --commits
Then commit the changes, preferably using pkgdev.
user $pkgdev commit --signoffIf pkgdev commit fails with an error like "error: gpg failed to sign the data", run the command again as GIT_TRACE=1 pkgdev commit ... and run the gpg command which fails manually to find the real error.
If the commit is to close or comment bugs on Bugzilla, these should be mentioned in the commit message as suggested by GLEP66. pkgdev supports this through the --bug and --closes options.
user $pkgdev commit --closes NNNNNN --signoffStep 3: User makes a pull request
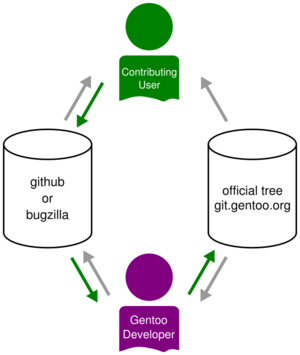
Now that the changes have been made and the local branch updated, it is time to send it off to GitHub and make a PR (Pull Request) for the Gentoo Developers.
Start by pushing the branch with the changes to your GitHub repository:
user $git push github <branch name>Then create a pull request from your GitHub repository's local branch to the Gentoo repository's master branch. When the changes have been merged, you may delete the local repository's branch with:
user $git checkout master
user $git branch -d <branch name>
user $git push github :<branch name>
Links to bug report(s)
A bot automatically picks up bug reports if the link(s) to the bug in question appear(s) in the body of the commit message. The bot then writes a message in the bug report and/or closes it. That way, other users quickly get to know a patch or a fix has landed in the tree.
This feature helps Gentoo developers save time as they don't have to switch back and forth between Bugzilla, GitHub, and their terminal to figure out which bug reports may be closed.
How does it work?
The bot can parse two types of header:
Bug: https://bugs.gentoo.org/123456
will automatically write a message in the bug report without closing it.
Closes: https://bugs.gentoo.org/123456
will automatically write a message in the bug report, change the status of the bug report to RESOLVED and the resolution to FIXED.
If the commit involves several bug reports, they can be mentioned and stack the links. The bot will write a message in each bug report:
Bug: https://bugs.gentoo.org/123456
Bug: https://bugs.gentoo.org/456789
Bug: https://bugs.gentoo.org/101010
It also works with the Closes: header:
Closes: https://bugs.gentoo.org/123456
Closes: https://bugs.gentoo.org/456789
Closes: https://bugs.gentoo.org/101010
Feel free to add as much information as possible: upstream forums, mailing lists, discussions, links to changelogs, etc. The bot won't post messages all over the place though, but these useful information will appear in the ChangeLog file of the ebuild.
QA checks
gentoo-repo-qa-bot is engaging in a conversation with me in the PR. I don't understand.
We have set up an automated CI system which performs various QA checks when a PR is filed. These checks may result in two possible outcomes displayed next to your PR:
- a green check-mark meaning everything's fine and your PR isn't offending the tree.
- a red cross meaning something is up and your PR needs fixing.
Our QA bot is chatty when a red cross shows up. At this point, it might point out two types of error:
Issues persisted from underlying repository state:
This error means that unfortunately, you forked the tree whilst it was in a very unstable state (meaning broken). Indeed, every now and then developers break the tree and, tough luck, it turns out you forked the tree into your GitHub profile or synced it up at this very moment. But no big deal as there's nothing for you to do.
New issues:
This error is a bit more serious and means your PR isn't complying with our QA standards. Usually, one or more link(s) are displayed right below for you to visualize in a browser what it's all about. Go ahead, take a look and fix those errors. Push again and wait for the bot to go over your PR again (every 30 minutes) until a green check-mark appears.
Troubleshooting
Possible issues with signing
It's possible that a message comes up like
user $error: gpg failed to sign the data
fatal: failed to write commit object
!!! Exiting on git (shell) error code: 128In such a case the GPG_TTY environment variable is to be set. To make sure it is always set, it can be added to the ~/.bashrc or to /etc/portage/make.conf:
~/.bashrcexport GPG_TTY=$(tty)
Setting pinentry to a terminal-friendly variant, like pinentry-ncurses or pinentry-tty might also help with this issue.
The available pinentry variants can be listed with eselect:
user $eselect pinentry listAvailable pinentry binary implementations: [1] pinentry-qt [2] pinentry-qt4 [3] pinentry-curses [4] pinentry-tty *
Set the desired handler with
root #eselect pinentry set [number]For further information about gpg, please visit to the GnuPG article.
See also
- Gentoo git workflow — outlines some rules and best-practices regarding the typical workflow for ebuild developers using git.
- Project:GitHub/Pull requests
- Standard git workflow — describing a modern git workflow for contributing to Gentoo, with pkgcheck and pkgdev
- Submitting_ebuilds — explains how to submit ebuilds for inclusion in the Gentoo ebuild repository
- Incus/Gentoo_Github_pullrequest_testing


