User:Sakaki/Sakaki's EFI Install Guide/Creating and Booting the Minimal-Install Image on USB
We can now proceed to download, verify and use the Gentoo minimal install image. This is a bootable, self-contained Linux system ISO disk image, updated regularly by Gentoo Release Engineering. As the name suggests, you can boot your target PC with it and, assuming you have internet access, parlay from there to a full Gentoo installation.
This section shadows Chapter 2 of the Gentoo handbook.
For simplicity, I'll assume you're doing this on your secondary, helper PC, which is running Linux. I'll denote that machine as pc2 in the command prompts.
Downloading and Verifying the ISO Image
Firstly, identify the name of the current release of the minimal install ISO (we'll refer to it using the generic form install-amd64-minimal-YYYYMMDDThhmmssZ.iso below). New versions come out multiple times per year. Open the link http://distfiles.gentoo.org/releases/amd64/autobuilds/latest-iso.txt in a browser to determine the current name.
Be sure to use an up-to-date version of this image: those issued prior to August 2018 only support booting in legacy, not EFI, mode,[1][2] and so are unsuitable for use with this tutorial.[3]
The variant part of the name is a timestamp — the first component of which is a date, then a 'T' separator, then a time, then finally a 'Z' (to denote UTC, or 'zero hours offset'). So for example, a real filename might be install-amd64-minimal-20180107T214502Z.iso, indicating that it was written at 9:45pm (and 2 seconds), on the 7th of January 2018.
We'll be using the amd64 architecture (processor family) in what follows. The reference to 'amd' is an historical artifact; all modern 64-bit x86 CPUs (including those from Intel) should use this architecture in Gentoo.
Open a terminal window on the helper PC, and download the necessary files (the ISO, a contents list for that ISO, and a signed digest list):
user@pc2 $cd /tmp
user@pc2 $wget -c http://distfiles.gentoo.org/releases/amd64/autobuilds/YYYYMMDDThhmmssZ/install-amd64-minimal-YYYYMMDDThhmmssZ.iso
Of course, substitute the correct release timestamp (which you just looked up) for
YYYYMMDDThhmmssZ in the above commands.This may take a little time to complete, depending on the speed of your Internet link.
We next need to check the integrity of the ISO, before using it. The install-amd64-minimal-YYYYMMDDThhmmssZ.iso.DIGESTS.asc file contains cryptographically signed digests (using various hash algorithms) for two other files you have downloaded.
As such, to verify the ISO we must:
- download the public key used for Gentoo automated weekly releases (if you don't already have this on your helper PC);
- check the signature of the install-amd64-minimal-YYYYMMDDThhmmssZ.iso.DIGESTS.asc file using this key; and then
- check that the hashes (digests) contained in that file agree with values that we compute independently.
For a brief primer on digital signatures, see the "Configuring Secure Boot" chapter of this tutorial.
The fingerprint of the automated weekly release public key may be found on the Gentoo Release Engineering page. When requesting the key from a keyserver, you don't need to cite the whole fingerprint, just enough of it to be unambiguous. For example, at the time of writing, the automated release key fingerprint was 13EB BDBE DE7A 1277 5DFD B1BA BB57 2E0E 2D18 2910, so to download it (step 1 in the above list), issue:
user@pc2 $gpg --keyserver pool.sks-keyservers.net --recv-key 2D182910
If this command fails, ensure you have enabled outbound access on your firewall for port 11371/tcp to allow HKP communication, along with the usual state-tracking input rule.
Alternatively, you can use the following command, to fetch the key over port 80 (which should be open on most firewalls):
user@pc2 $gpg --keyserver hkp://pool.sks-keyservers.net:80 --recv-key 2D182910
If the above keyserver is unavailable for some reason, you should be able to use any other one, such as pgp.mit.edu for example.
If the fingerprint has changed, substitute the correct value for
2D182910 in the above.You should next verify that the key's full fingerprint matches that listed on the Release Engineering page:
user@pc2 $gpg --fingerprint 2D182910
pub   rsa4096 2009-08-25 [SC] [expires: 2020-07-01]
      13EB BDBE DE7A 1277 5DFD  B1BA BB57 2E0E 2D18 2910
uid           [ unknown] Gentoo Linux Release Engineering (Automated Weekly Release Key) <releng@gentoo.org>
sub   rsa2048 2019-02-23 [S] [expires: 2020-07-01]
Although correct at the time of writing, the key ID you need to enter in the above command may differ from
2D182910, as may the fingerprint data shown. Always use the Release Engineering page data as your primary reference.If all looks good, use the gpg program to verify the digest file (step 2):
user@pc2 $gpg --verify install-amd64-minimal-YYYYMMDDThhmmssZ.iso.DIGESTS.asc
Substitute the correct release timestamp for
YYYYMMDDThhmmssZ in the above command.You can ignore gpg output such as:
gpg: WARNING: This key is not certified with a trusted signature!
gpg:          There is no indication that the signature belongs to the owner.
Assuming that worked (the output reports 'Good signature'), next check the digests themselves (step 3); we'll use the SHA512 variants here:
user@pc2 $awk '/SHA512 HASH/{getline;print}' install-amd64-minimal-YYYYMMDDThhmmssZ.iso.DIGESTS.asc | sha512sum --check
Substitute the correct release timestamp for
YYYYMMDDThhmmssZ in the above command.If this outputs:
install-amd64-minimal-YYYYMMDDThhmmssZ.iso: OK
install-amd64-minimal-YYYYMMDDThhmmssZ.iso.CONTENTS: OK
then continue, all is well.
Copying the ISO Image to USB
Next, we need to copy the ISO onto a USB key (the image is already hybrid[5]).
Just before inserting the USB key (the larger one) into the helper pc, issue:
user@pc2 $lsblk
Note the output, then insert the USB key, and issue:
user@pc2 $lsblk
again. The change in output will show you the key's device path (note that the initial /dev/ prefix is not shown in the lsblk output). We will refer to this path in these instructions as /dev/sdX, but in reality on your system it will be something like /dev/sdb, /dev/sdc etc.
If the device has automounted, and lsblk shows that the device has a non-blank mountpoint for one or more of its partitions, you must unmount these, using umount, before proceeding.
For example, suppose the USB key showed up as /dev/sdb on your system, and its first partition /dev/sdb1 automounted (at /var/run/media/user/myusbkey or some similar path). Then you would issue:
user@pc2 $umount --verbose /dev/sdb1
to unmount it.
If you have problems, you may need to run the umount as the root user.Next, we will write the ISO image to the USB key. This will require root access, so issue:
user@pc2 $su --login root
Password: <enter root password (on helper PC)>
Now you can write the ISO image to the USB key (note, we use a larger than default block size here, for efficiency). Issue:
root@pc2 #dd if=/tmp/install-amd64-minimal-YYYYMMDDThhmmssZ.iso of=/dev/sdX bs=8192k status=progress && sync
Wait for the process to complete before continuing.
This will wipe everything on the USB key. Double check that there is nothing on there you want before proceeding. Make sure you have the correct device path! Note also that we need to target the device itself, and not a partition within it, so for /dev/sdX in the above command, use e.g. /dev/sdb and not /dev/sdb1; /dev/sdc and not /dev/sdc1, etc.
Substitute the correct release timestamp for
YYYYMMDDThhmmssZ in the above command.You can safely omit the
status=progress option, if it not supported in your version of dd.Booting the ISO Image
Modern Gentoo minimal install images can be booted under EFI (as well as 'legacy' / CSM mode), but do not support secure boot. As such, we'll need to bring up your target PC — using the USB key you just set up — under UEFI but with secure boot temporarily disabled (of course, the kernel we'll ultimately create will secure boot under EFI).
So, to proceed, take the USB key from the helper PC (where we just dd'd it) and insert it into the target PC. The latter is still running Windows, and you need to reboot it into the BIOS setup GUI. There are two ways to do this; choose the one that suits you:
- Either: Use Windows boot options menu.
- This is the easier method (particularly if your target machine is using the 'fast boot' option with Windows).[6] In Windows, hit CtrlAltDelete, then click on the power icon at the bottom right of the screen, and then while holding down Shift, click 'Restart' from the pop-up menu. This will pass you into the Windows boot options menu. Once this comes up (and asks you to 'Choose an option'), click on the 'Troubleshoot' tile, which brings up the 'Advanced options' panel (in Windows 10, you have to click on the 'Advanced options' tile to show this): from this, click on 'UEFI Firmware Settings', and confirm if prompted. Your machine will then restart into the BIOS GUI directly (no hotkeys required) and you can proceed.
- Or: Use the BIOS hotkey.
- This is a less reliable method, since you are racing the OS loading process. To use it, hit CtrlAltDelete from within Windows, then click on the power icon at the bottom right of the screen, and choose 'Restart' from the pop-up menu to perform a regular restart. Then, immediately the target PC starts to come back up, press the appropriate hotkey to enter the BIOS setup GUI. Unfortunately, the required hotkey varies greatly from machine to machine (as does the BIOS user interface itself). On the Panasonic CF-AX3, press F2 during startup (you may need to press it repeatedly).
Once you have the BIOS configuration GUI up, you need to perform the following steps:
- disable legacy / CSM boot mode (if available and currently the active default);
- enable EFI boot mode (if not already the active default);
- ensure any 'fast boot' / 'ultra fast boot' options (if present) are disabled (as these may cause USB to be disabled until the operating system comes up);
- turn off secure boot (for the reason noted above);
- select the Gentoo minimal install USB key as the highest priority UEFI boot device; and
- restart your machine (saving changes).
It's impossible to be precise about the GUI actions required to achieve the above, as they will vary from BIOS to BIOS. However, to give you an idea, here's how you would go about it on the Panasonic CF-AX3 (which has an AMT BIOS).
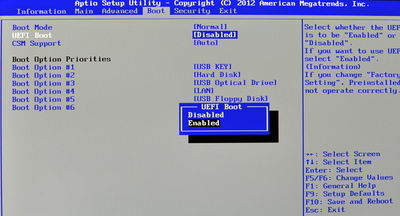
to move to the 'Boot' tab. Then, navigate down to the 'UEFI Boot' item, and press Enter. In the popup that appears, select 'Enabled' using the arrow keys, and press Enter. This switches the system out of legacy / CSM boot and into standard UEFI mode (steps 1 and 2 in the list above):
If your target system was already in UEFI mode (quite likely for a modern system running Windows), then you will have nothing to do here. Similarly, some PCs (for example, ultra-compacts) do not support legacy boot at all (in which case you can, of course, safely skip the above step).
Next, if you have a 'Fast Boot' / 'Ultra Fast Boot' option in your BIOS, you should turn it off at this point (step 3 in the list); as this may cause USB devices to be disabled at boot time. The Panasonic has the choice of 'Normal' (as here) or 'Compatible' boot modes; 'Normal' does allow boot from USB and works with the USB keys I used, but if you have problems (and the same BIOS), you could try switching this to 'Compatible' instead).
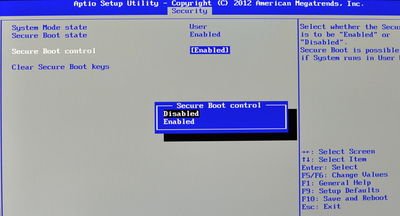
Then (step 4), we'll turn off secure boot, since the Gentoo minimal install image isn't signed with a Microsoft-sanctioned key (don't worry, we'll set up our own secure-boot keystore later in the tutorial). On the CF-AX3, use the arrow keys to select the 'Security' tab, then navigate down to the 'Secure Boot' item, and select it by pressing Enter. This enters a 'Security' sub-page; navigate to the 'Secure Boot control' item, and press Enter. In the popup that appears, select 'Disabled' using the arrow keys, and press Enter:
Next, on the CF-AX3, if your machine was originally in CSM / legacy boot mode during step 1 above, it is necessary to restart the machine at this point (as it will not pick up valid UEFI boot devices immediately upon switching into UEFI boot mode). Again, the method to achieve this varies from machine to machine; on the Panasonic's BIOS, hit F10 to restart, and confirm if prompted.
If your machine was already in UEFI boot mode during step 1 (likely for modern Windows machines) you may safely skip the above restart.
Many BIOSes behave in this manner, and must be restarted when changing from CSM/legacy to UEFI boot (and vice versa), before all BIOS boot options relevant to that new mode can be specified.
When the machine restarts, hit F2 again, to re-enter BIOS setup.
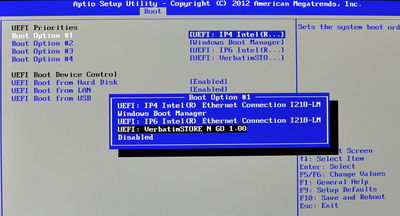
Now we can select a boot device (step 5) — if you don't do this, you'll simply be dumped back into Windows when you restart. Using the arrow keys, navigate to the 'Boot' tab, and then down to the 'UEFI Priorities' item. Press Enter, and a sub-page is displayed. Ensure the item 'UEFI Boot from USB' is enabled (if it isn't, enable it now, and then press F10 to restart (confirming if prompted), and come back to this point). Navigate down to 'Boot Option #1' and press Enter. In the pop-up menu that appears, select your (Gentoo minimal install) USB key, and press Enter to select it:
The item that you need to select from this menu will of course depend the make and model of your minimal install USB key.
With some BIOSes you will also have to specify which file on the chosen USB device to boot - if so, you should enter (or select) /EFI/Boot/bootx64.efi (most BIOSes however will not require this, as this path is the EFI default).
That's it! Now press F10 to restart (step 6; the required method varies from BIOS to BIOS), and confirm if prompted.
Hopefully, after a short delay you'll be presented with a GRUB boot screen. Unless you want to enter custom options — which most users will not — simply press Enter to proceed. After a few seconds (and before you are provided with a command prompt), you'll be asked to choose a keymap. It's important, particularly on a machine with non-standard keyboard layout such as the CF-AX3, to get this right, otherwise you may have problems with passwords and so forth. Again, the correct map to choose will obviously depend on your machine but, on the Panasonic CF-AX3, press 22Enter to select the Japanese keymap.
A few seconds later, you should have a Gentoo Linux root command prompt! Now, we'll set-up a root password (this is only for use during the install, it will not persist across into the final system).
livecd ~ #passwd root
New password: <enter your new password>
Retype new password: <enter your new password again>
passwd: password updated successfully
Make a note of the password, as you will require it shortly.
Setting the Date and Time
It's important to ensure that you have the correct time and date on your target machine. Check it with:
livecd ~ #date
Per the handbook, you should stick with UTC for now (the real timezone specification will come later in the install). If necessary, set the date and time, in MMDDhhmmYYYY format (Month, Day, hour, minute, year):
livecd ~ #date MMDDhhmmYYYY
Substitute
MMDDhhmmYYYY in the above with the correct date/time string. For example, to set the UTC date/time to 5:12pm on February 9th 2017, you would issue
livecd ~ #date 020917122017
Next Steps
Next, we'll setup the network and get an SSH daemon running. Click here to go to the next chapter, "Setting Up Networking and Connecting via ssh".
Notes
- ↑ Gentoo Forums: "The Gentoo minimal installation CD doesn't boot in UEFI"
- ↑ Gentoo Forums: "Gentoo Minimal ISO EFI Boot?"
- ↑ Advanced users: it is possible to adapt legacy images so they will boot on EFI, as I describe here.
- ↑ Information Security Stack Exchange: "Ways to sign gpg public key so it is trusted?"
- ↑ SuperUser Forum: "How do I determine if an ISO is a hybrid?"
- ↑ Hoffman, Chris. "How To Access The BIOS On A Windows 8 Computer"
| < Previous | Home | Next > |


