User:Sakaki/Sakaki's EFI Install Guide/Sandboxing the Firefox Browser with Firejail
What is the most vulnerable application on your desktop? For most users, it is the web browser, since — in the picturesque phrase of Nick Congleton — it is "a large and complex piece of software with the ability to execute code, and it accesses the open Internet and executes just about everything that it comes into contact with".[1] Whilst selective-execution plug-ins such as NoScript can (and should[2][3][4]) be used to mitigate this risk, they cannot entirely remove it.[5]
Furthermore — hardening tools such as AppArmor notwithstanding — the very design of the X11 display server underpinning most Linux desktops means that a compromised application can easily log all keystrokes, capture images of the screen, and even inject key and mouse events into any other application running on the same display — and that's just when running as the regular user, without privilege escalation. As such, the consequence of even a modest compromise of the web browser on your system can be devastating.
Fortunately however, with just a little effort, it is possible to effectively 'sandbox' graphical applications, so that:
- they use their own isolated X11 server, with no access to, or visibility of, the "host" desktop, thereby inhibiting keylogging and similar attacks; and
- they run inside a Linux 'container',[6] thereby inhibiting many other categories of process-level exploit.
Accordingly, in this mini-guide, I will be running through the process of X11-sandboxing the popular, open-source Firefox web browser on your target PC, using the powerful Firejail[7] utility (and Xephyr X11 server-in-a-window). The approach described may easily be generalized to other browsers (or indeed applications, for example, mail clients etc.), and will work for both systemd and OpenRC users.
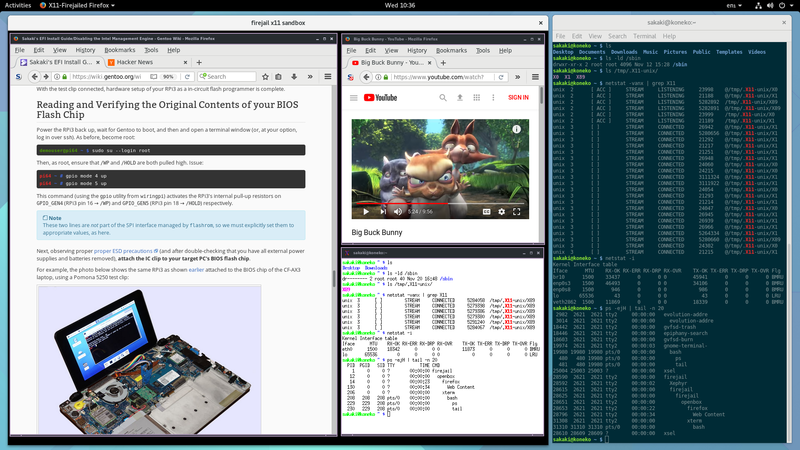
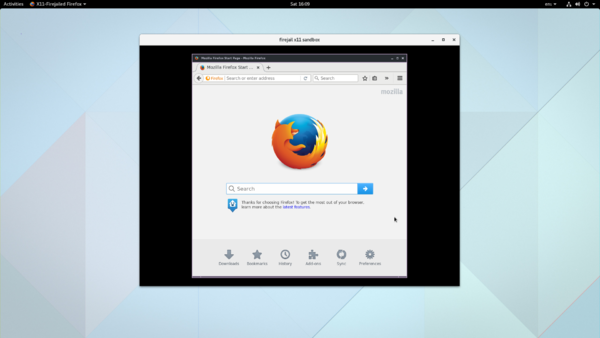
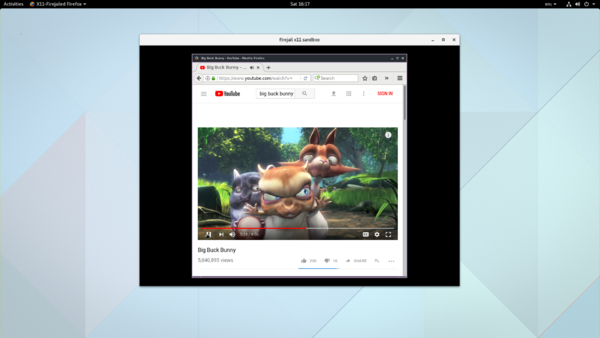
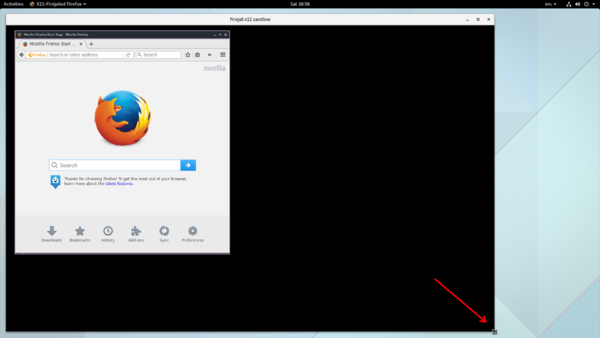
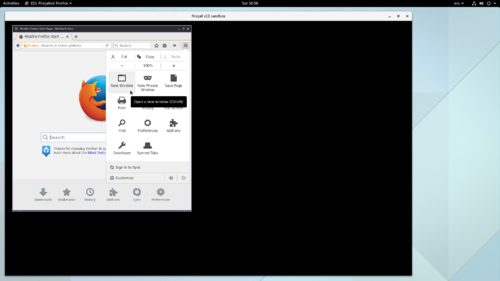
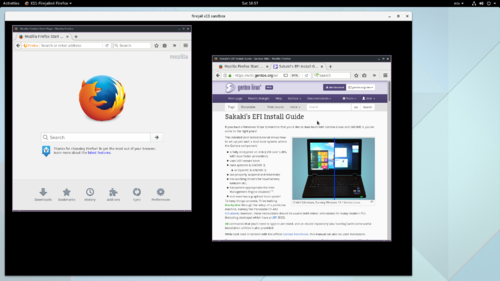
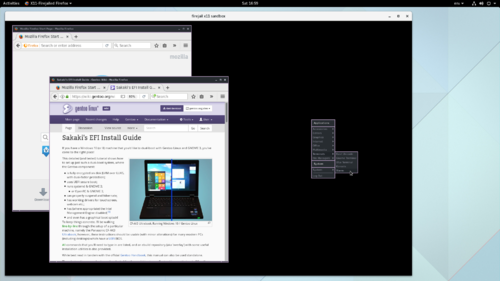
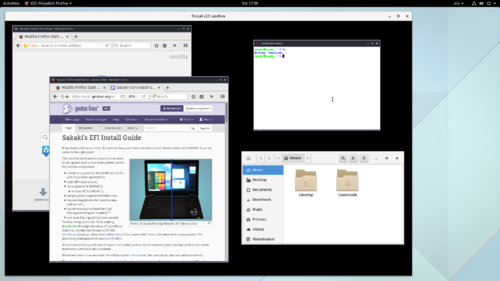
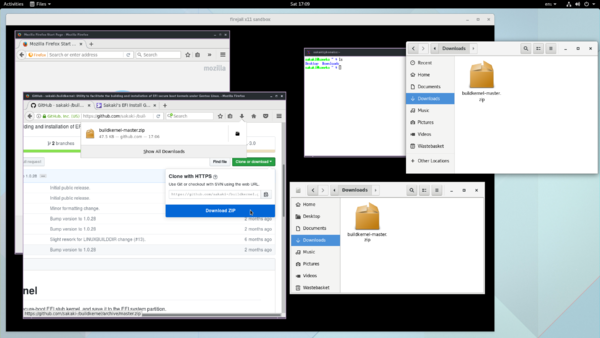
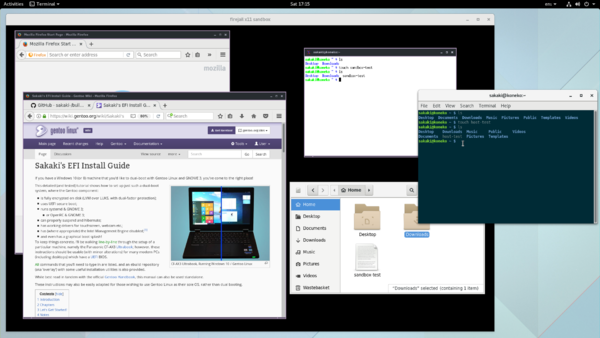
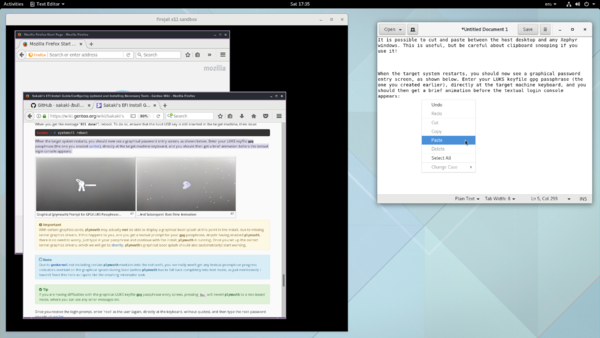
The screenshot below shows an X11-sandboxed Firefox browser in use:
Note that when deployed in this manner, firefox remains fully functional (so e.g., HTML5 videos on YouTube still work, as shown above), but runs in a highly 'locked-down' environment (aka 'sandbox'), wherein:
- the parent "desktop" X11 server is not accessible; its sockets (including its abstract UNIX domain socket) are masked through the use of file and network kernel namespaces, thereby e.g., preventing keylogging etc.;
- the range of permitted system calls is greatly restricted, via a comprehensive seccomp-bpf filter, and any attempt to call one of the restricted functions causes immediate termination of the process;
- seccomp-bpf is also used to restrict the permitted socket protocols (to only IPv4, IPv6, UNIX and netlink);
- all Linux capabilities are explicitly dropped, as an additional barrier against privilege escalation;
- via filesystem protection, only a small subset of your machine's full directory structure is visible, critical files are set read-only, many programs are masked, and only a tightly defined subset of your home directory files can be accessed;
- a local network stack is used, with packet forwarding to your main network arranged outside the sandbox, so the application cannot capture or monitor other network traffic;
- via a PID namespace, only processes local to the sandbox are visible within it; and
- (optionally) via a user namespace, within the sandbox no root account is even present.
(Don't worry if some of the above terms are unfamiliar; they will be more fully explained shortly).
Furthermore, unlike a 'full' virtualisation environment (such as e.g., Xen, VirtualBox or QEMU), Firejail sandboxes do not each run their own copy of a full-blown operating system — they simply live in a resource-isolated environment created by standard facilities of your system's existing Linux kernel. As such, despite the high level of protection offered, the overhead of running a Firejail sandbox is extremely low. Furthermore, there are no background server processes required, nor are there any out-of-tree kernel modules or similar to maintain.
While systems using the more modern Wayland display server protocol (now the default in this guide) do provide isolation between graphical applications, the material covered here is still important, as:
- at the time of writing, Wayland deployment is still relatively uncommon;
- further, Wayland does not provide (nor does it aim to) the other (non-graphical-isolation) sandboxing features that firejail does; and
- even where Wayland is deployed, unported or partially ported X11 applications (and this currently includes Firefox [8]) are usually handled by placing them all within a shared XWayland[9] X11-server anyhow, rendering them all accessible to one another.
For avoidance of doubt, the instructions in this guide will work regardless of whether your 'host' GNOME desktop is running natively on X11, or Wayland.
The process we will be going through is as follows:
- reviewing some (optional, but useful) introductory background material;
- ensuring that you have the necessary (GNOME 3 + X11, or GNOME 3 + Wayland) baseline system available;
- installing the required software, which will entail:
- rebuilding your kernel with the necessary options enabled;
- installing the www-client/firefox browser (if you do not already have it);
- rebuilding x11-base/xorg-server with Xephyr support, and installing some X11 utilities;
- installing the sys-apps/firejail package (and some supporting utilities);
- installing the x11-wm/openbox window manager, for use inside xephyr;
- configuring your X11 sandbox, viz.:
- setting up a persistent bridge, to which the sandbox can connect;
- setting up a routing firewall (via iptables), to forward sandbox traffic from the bridge to your main network interface;
- setting up an "autostart" service script, to enable xephyr window resizing and (configurable) clipboard sharing;
- modifying firejail's configuration file (to specify some xephyr settings);
- creating an /etc/firejail/firefox.local file, for 'tweaks' to firejail's default firefox security profile;
- setting up a .desktop file, to allow the sandboxed browser to be launched graphically;
- testing your new X11-sandboxed browser;
- some tips for day-to-day use will also be provided here;
- as will some brief troubleshooting hints.
With the configuration described in this mini-guide, the sandbox will work even on machines that use a WiFi interface as their main network connection (something that firejail does not directly support using its
--net=<ifname> option).For non-graphical applications, using firejail is as very simple - just prefix your normal application invocation with it (for example,
firejail bash, firejail wget <url> etc. Please don't form the impression that firejail is a difficult program to use — for everyday use, quite the reverse is true, and indeed this was one of its design goals.The approach presented in this article is necessarily more complex, only because of the need to properly isolate the X11 graphical environment, and to allow WiFi adaptors to be used with the network namespacing which that isolation requires.
If you are ready, let's go!
Introduction
We'll begin with a simple demonstration that 'vanilla' X11 does not provide any isolation between applications running within the same desktop (X server[11]), as even many experienced Linux users are unaware this is the case. Then, we'll discuss how it is possible to isolate X11 processes, through the use of a separate, "nested" X server (in our case, xephyr) running within an appropriate firejail sandbox, and we'll conclude by running through some of firejail's sandboxing features in a little more detail.
If you are already familiar with this background material, feel free to click here to skip this section, and get on with installation directly.
Demonstrating the X11 Vulnerability
As just mentioned, by default X11 does not provide any GUI isolation between running applications. That means, inter alia, that any application granted access to your display (on an X11-based desktop, such as GNOME[12]) can read and inject keystrokes into any other (even if their underlying processes have different uids), take snapshots of the desktop or individual windows, and even move and resize windows at will. This holds true even if standard process-level sandboxing (for example, via a framework such as SELinux) is in use, and as such can nullify any other security precautions taken on a system.[13]
You can easily demonstrate this yourself. Log into your GNOME desktop as your regular user (this will be sakaki in what follows, but obviously, adapt for your particular case). That done, open a terminal window, become root, and install the necessary software:
koneko ~ #emerge --verbose --noreplace x11-apps/xinput x11-apps/xwd
The host name you see when running these commands will reflect the settings on your target PC, rather than koneko.
These are small programs and will not take long to download or install. Next, from the root prompt, start a gedit text editor session:
koneko ~ #gedit /root/secret_passwords.txt
A gedit text editor window will open. Now, since this process is running as the root uid, and using a file location (/root/secret_passwords.txt) that is inaccessible to regular users, you might reasonably believe it to be secure... but as we will shortly see, it is not.
If you are using (X)Wayland with GNOME, then the gedit application won't be vulnerable to this attack. However, you can still demonstrate it using another editor, for example emacs.
Alternatively, you can temporarily log into a GNOME-on-X11 session for the duration of the demonstration, as described earlier (systemd, OpenRC).
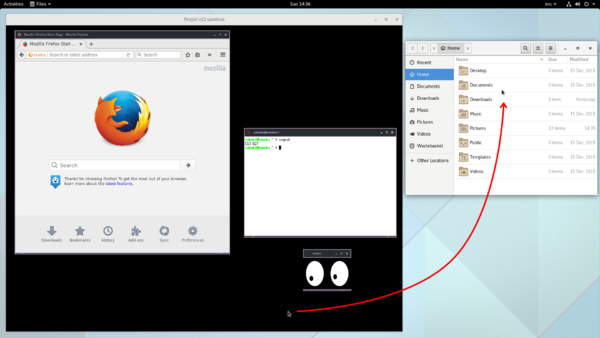
If you are using Wayland, a quick way to see if a given application is running 'natively', or is hosted inside the shared XWayland X11 server, is to run the xeyes program. If the 'eyes' move to follow the cursor when it is in your application's window, then the app is using X11; if not, it is using Wayland.[14]
The eyes will be watching you when running firefox ^-^
You can also run the xlsclients program (at a terminal, as the regular user) to get a list of all applications using the XWayland server.[15]
Next, before typing anything in the gedit window, open another terminal window (as your regular, unprivileged user) and issue:
sakaki@koneko ~ $xinput --list
A list of pointer and keyboard devices known to your X11 server will be displayed. Note the id of the keyboard device (there may be more than one, in which case, note them all, and then try the last-listed id first, in what follows). Then issue:
sakaki@koneko ~ $xinput test 11
Key release 36
Substitute for the number 11 in the above with the actual id of your keyboard, as returned from xinput --list.
If xinput does not immediately output a Key release <nn> message as above (caused by you letting go of the Enter key, which you pushed down to execute the xinput test <id> command in the first place), then you have specified the wrong id value — in that case, press Ctrlc to quit xinput, then try the command above again with a different id (from the original set of candidates you gleaned via xinput --list).
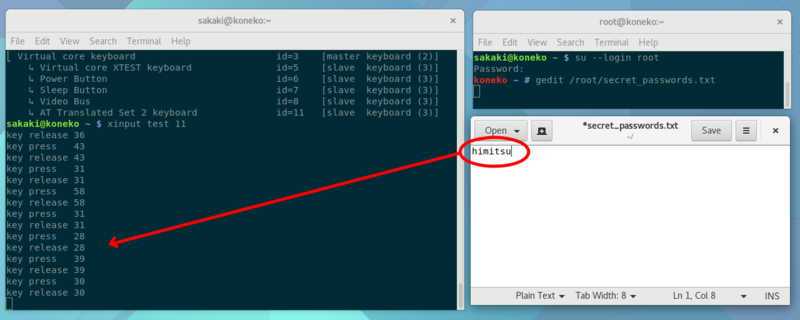
Once it is working, mouse back into the (root) gedit window again, and start typing. Notice how your keystrokes are reflected by the xinput test <id> program, even though it is not running as root:
The numbers output are keyboard scan codes (in this case, for a UK layout keyboard), not ASCII codes. For those interested, a conversion table (in hex) may be found here.
When done, click on the terminal window in which xinput is running, and press Ctrlc to quit it. Then, leaving the gedit window open for now, issue:
sakaki@koneko ~ $xwd -display "${DISPLAY}" -root | convert xwd:- screen.png
Again, if you are using (X)Wayland with GNOME, the above command will not work, as the XWayland server is rootless[16]. However, it is still possible for any application running on the shared XWayland server (i.e., X11 applications not yet ported to Wayland) to grab the windows of any other, by specifying the appropriate window identifier to xwd, via
-id <id> [17]).These commands, again running only as the standard user (not root), will silently take a full desktop screenshot (including the gedit window with the notional secret password text) and save it to ~/screen.png.
You can check it worked with the eog ('eye-of-gnome') image tool, if you like:
sakaki@koneko ~ $eog screen.png &
Close out the eog viewer and (standard user) terminal window when done, then also close out the gedit window (there's no need to save the /root/secret_passwords.txt file, we were just using it for illustration). Finally, type Ctrld followed by Ctrld again in the root terminal window, to close it.
As you can appreciate from the above, running X11 represents quite a significant security risk, particularly with applications like web browsers, which routinely execute large quantities of arbitrary, unchecked code during everyday use.
There isn't anything 'magic' about the applications xwd or xinput either; simply blocking or removing them from your system won't fix the underlying vulnerability. Any program with access to your X11 server's UNIX socket (and appropriate X11 authorization, whether via 'magic cookie' or uid) can do everything just demonstrated, and worse.
Although X11 does have a security extension (xcsecurity USE flag) that addresses this problem to some extent — by partitioning desktop apps into two sets: 'trusted' and 'untrusted' (via distinct 'magic cookies' / Xauthority files), and preventing apps in the latter group from meddling with those in the former — and while this is supported directly in firejail (via the
--x11=xorg option) I would advise against its use under GNOME. That's because:
- firejail assumes that your Xauthority file is located in ${HOME}/.Xauthority, and during sandbox startup creates a new, untrusted Xauthority and bind-mounts it over that location; unfortunately however, in GNOME, with the gdm login manager, the actual Xauthority location is /var/user/<uid>/gdm/Xauthority — so the application still has full access despite this precaution;
- furthermore, even if the new, untrusted Xauthority file were to be bind-mounted in the right place, the target application has to elect to use it to be affected, since gdm also activates xhost authorization for the logged-in user directly [18] (as such, if the new application offers no Xauthority file, but merely runs with the logged-in user's uid, it will still be granted 'trusted' privileges (as that user)); and
- with the
--x11=xorgapproach, the application is still running in the main, desktop X11 server, so notwithstanding the first two objections, this is still more risky than running it in a separate X11 server instance (for example, should you wish to prevent clipboard snooping).
If you are interested in taking the sandboxing / "security through isolation" concept even further, it's worth taking a quick look at Qubes OS. This (meta) operating system allows the user to create a number of (Xen-based) virtual machines, one per security domain, run one or more applications in each domain, and have all the applications render to a common desktop. The approach can provide extremely strong protection,[19] but is relatively resource-intensive compared to firejail (as it relies on a type-1 hypervisor).
Sandboxing with Firejail: A Brief, High-Level Tour
As we are going to be using sys-apps/firejail to sandbox the firefox web browser on your machine, in this section, we'll briefly discuss the isolation technologies it offers[20] (actual installation and usage instructions will be given thereafter; click here if you wish to jump directly to that section).
In its simplest form, you can sandbox an application simply by prefixing its command line with firejail (run as your regular user; the firejail program itself is SUID). So, for example, firejail gedit ~/test.txt would run the gedit text editor on the file ~/test.txt, inside a sandbox. As discussed below, there are various protection mechanisms firejail can employ, and these are automatically specified on a per-application basis through the use of a profile configuration file.[21] When a program <appname> is launched under firejail, it will automatically try to load the matching security profile /etc/firejail/<appname>.profile (for our example, this would be /etc/firejail/gedit.profile). If no such file exists, the (fairly restrictive) /etc/firejail/default.profile is used instead (unless the sandbox has been started by the root user, in which case /etc/firejail/server.profile is used).
You can override the /etc/firejail/<appname>.profile binding by:
- providing a file ~/.config/firejail/<appname>.profile;
- or, since all 'standard' profiles also try to source the additional customization file /etc/firejail/<appname>.local when read, if you simply want to 'tweak' an existing profile, you can supply your additional configuration settings via that file (this approach has the benefit of allowing the main application profile to be upgraded whenever the rest of the package is);
- or, you can direct that a specific profile be used for a given app, by passing the
--profile=<path>option to firejail when invoking it; - or, you can direct that no profile be used, by passing the
--noprofileoption to firejail when invoking it; if you do so, most of firejail's protection mechanisms will be disabled (i.e., it is not at all the same thing as running with the default profile).
We'll now briefly discuss the main categories of protection offered by firejail. Note that you won't actually need to run any of the examples here on your own machine — just read through them, they are presented simply to familiarize you with the concepts involved. (Also, we have not yet configured your machine correctly to run firejail; but of course, once we have, you can come back and try these out for yourself, if you like.)
Graphical Isolation via Xephyr
The first point to note is that firejail allows a graphical program to be started within its own, dedicated X11 server (via the use of its --x11=<servertype> option).[22] In what follows, we will use Xephyr — a full X11 server that outputs to a (resizeable) window on a pre-existing 'host' X display.
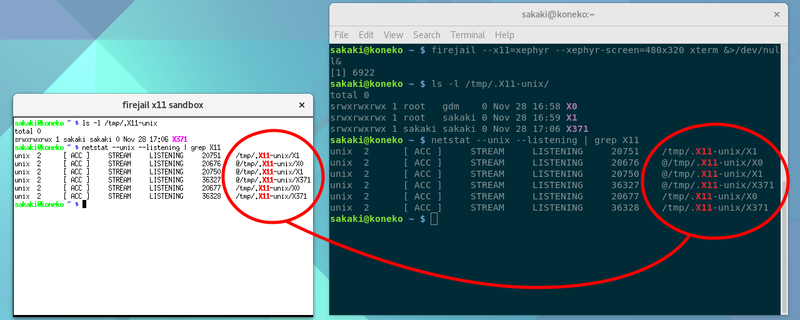
The below screenshot shows an xterm terminal, launched on a xephyr X11 server, using firejail from the command line:
As can be seen, in the gnome-terminal window (running on the 'outer' X11 server) there are three X11 UNIX sockets visible within the filesystem, at /tmp/.X11-unix/X0, /tmp/.X11-unix/X1 and /tmp/.X11-unix/X371. The first of these, X0, is uid root and connects to the gdm login manager's X11 server. The second, X1, connects to the X11 server hosting the GNOME desktop itself (so e.g., running echo $DISPLAY in the gnome-terminal session would return :1); it is the 'outer' (aka 'host') X11 server in this case. And the third, here X371, is connected to the xephyr X11 server (so e.g. running echo $DISPLAY in the xterm would return :371); it is the 'inner' or 'nested' X11 server in this example.
Although — courtesy of firejail's default filesystem protection — within the xterm context (i.e., running on the xephyr server) only /tmp/.X11-unix/X371 is visible at the directory level (compare the outputs of ls -l /tmp/.X11-unix/ in the two terminals above), this is not sufficient for graphical isolation, as the netstat --unix --listening | grep X11 output shows. The funny looking paths starting with '@' are UNIX abstract domain sockets[23], which are filesystem independent, and make it possible for e.g. even a baseline xephyr-sandboxed program to capture input from the 'outer' desktop, unless other precautions are taken.
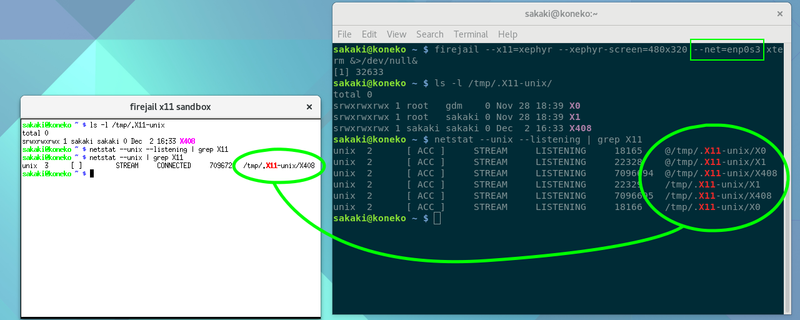
To get around this issue, and properly isolate the 'host' X11 server's sockets, we need to run Firejailed programs within their own network namespace (discussed shortly). By default, firejail will support this natively if you use a wired Ethernet interface on your machine; for example, in the below screenshot, there is an Ethernet adaptor available on enp0s3, so we can simply add --net=enp0s3 to the firejail command line, which solves the problem:
Unfortunately however, this simple approach will not work for a WiFi interface (which on many laptop machines represents the primary, and often only, means of network connectivity) (we'll discuss the reason why shortly). As such, in the main text, we will provide a slightly different solution (using a bridge and routing firewall) which will work for with both wired and wireless interfaces.
One other point to note from the above screenshots: if you look carefully, you'll see that the xterm window itself (not to be confused with the xephyr frame, which is entitled firejail x11 sandbox) has no title bar or other window decorations, and is not resizeable. Nor is it possible to dynamically open other windows 'inside' the xephyr frame. To work around these issues (which would be unacceptable when using a browser) we will run the x11-wm/openbox window manager on xephyr when deploying firefox (openbox is a very capable yet lightweight window manager; it will do what we want 'out of the box', but can also be extensively customized, should you require this).
Permitted Syscall Management via Seccomp-BPF
The next isolation technique utilized by firejail is Seccomp-BPF (which stands for secure computing - Berkeley packet filter). This is a Linux kernel facility, via which the system calls available to a given userland process (and its descendants) may be restricted for safety. It works by intercepting syscall requests and matching their syscall number and argument list via a pre-specified BPF program (in this case, supplied by firejail)[24] The BPF program's rules specify the subsequent action to take if a match occurs (for example: allow the call, return an error code, kill the calling process etc.)
Most firejail profiles (including the default profile and firefox profile) specify a fairly restrictive seccomp-bpf filter set, which, at the time of writing, blocks the following syscalls:[20] mount, umount2, ptrace, kexec_load, kexec_file_load, name_to_handle_at, open_by_handle_at, create_module, init_module, finit_module, delete_module, iopl, ioperm, ioprio_set, swapon, swapoff, syslog, process_vm_readv, process_vm_writev, sysfs, _sysctl, adjtimex, clock_adjtime, lookup_dcookie, perf_event_open, fanotify_init, kcmp, add_key, request_key, keyctl, uselib, acct, modify_ldt, pivot_root, io_setup, io_destroy, io_getevents, io_submit, io_cancel, remap_file_pages, mbind, set_mempolicy, migrate_pages, move_pages, vmsplice, chroot, tuxcall, reboot, mfsservctl, get_kernel_syms, bpf, clock_settime, personality, process_vm_writev, query_module, settimeofday, stime, umount, userfaultfd, ustat, vm86, vm86old, afs_syscall, bdflush, break, ftime, getpmsg, gtty, lock, mpx, pciconfig_iobase, pciconfig_read, pciconfig_write, prof, profil, putpmsg, rtas, s390_runtime_instr, s390_mmio_read, s390_mmio_write, security, setdomainname, sethostname, sgetmask, ssetmask, stty, subpage_prot, switch_endian, ulimit, vhangup and vserver.
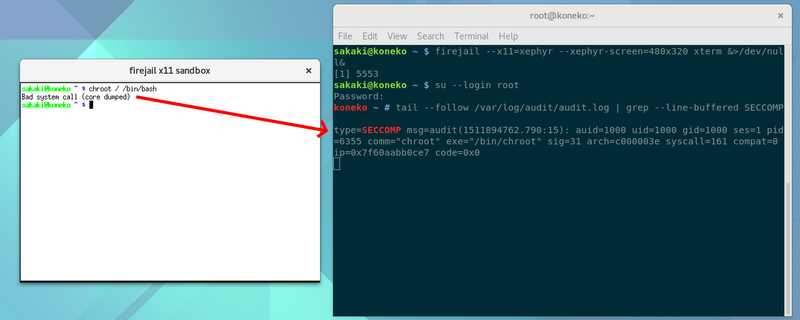
The below screenshot shows an example of seccomp-bpf in use. In it, a chroot call is attempted within an xterm process running inside firejail sandbox. Because this call is one of those restricted by default (see the list above), the chroot binary is aborted and an error is written to the audit log, /var/log/audit/audit.log (note that you need to have CONFIG_AUDIT turned on in your kernel, have sys-apps/systemd or sys-apps/openrc (as appropriate) compiled with the audit USE flag, and have auditd running, to be able to see this log).
By default, both 32-bit and 64-bit filters are installed.
One other point worth mentioning is that firejail can also use seccomp-bpf to restrict the socket protocols permissible for an application, and indeed its firefox profile does this, enabling only the IPv4, IPv6, UNIX and netlink protocols. To be fair, this doesn't provide a great deal of additional security, but it does not hurt to have it activated.
Privilege Management via Capabilities
As a third isolation technique, firejail provides the ability to restrict the capabilities of a Linux process.
To briefly explain: historically UNIX implementations segregated processes into two simple groups, viz:
- root-privileged processes, which bypass all kernel permission checks; and
- unprivileged processes, which are subject to full ACL-based permission checking, based on the effective user and group IDs (uid/gid), and the supplementary group list.[25]
That all changed with the introduction of capabilities, in Linux kernel 2.2. Capabilities split up the monolithic root privilege into smaller blocks (or sets) of permissions, which can be independently enabled or disabled on a per-thread basis (and as of kernel 2.6.24, may also be persistently associated with executable files, via extended attributes[26]).
By default,[27] firejail drops all all capabilities from the firefox process. Inter alia, this causes subsequent attempts by the process (or its children) to load kernel modules, escalate privileges, replace the kernel, restart the system etc. to be rejected.
Unlike firejail's seccomp-bpf filter, attempts to use a syscall requiring an unavailable capability simply cause an error code to be returned, they do not abort the process.
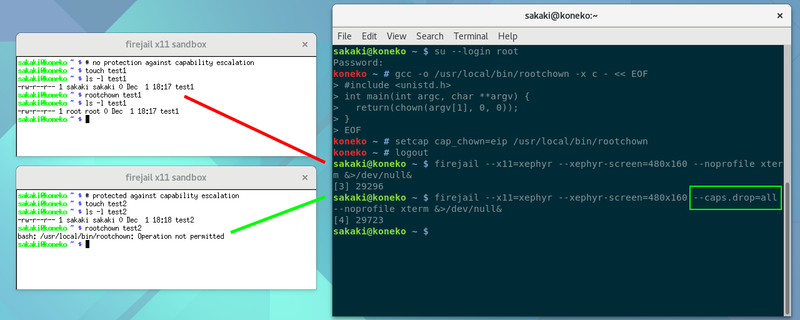
The below screenshot shows an example of this in action. In it, a trivial program (rootchown) is first compiled (by root); this application simply attempts to set the ownership of a file (the pathname of which is given as its first argument) to uid 0 gid 0 (root:root). Of course, under Linux, such a program would normally fail unless also invoked by the root user. However, next, the cap_chown capability is added to the executable's extended attributes via setcap (you can think of this as a sort of restricted SUID, allowing the program to carry out the chown operation when invoked by any user (who needs only the right to execute it)).
Then, two xterm windows are started. In the first (upper left) one, no firejail profile is used, so the unprivileged user can successfully use the dangerous rootchown program to make a newly created file (~/test1) owned root:root.
However, in the second (lower left) window, all capabilities are explicitly dropped (via the --caps.drop=all option). In this case, the attempt to run rootchown fails, with an Operation not permitted error.
The 'no-capabilities' status for a process under Linux is inherited by all its children, and, once capabilities are dropped, there is no way to get them back (modulo any serious kernel security bugs; however, see also the note below for one 'gotcha' you need to guard against). As such, this facility represents a very important line of defence against exploits. At the time of writing, the capabilities dropped by firejail's firefox profile are[26]: CAP_AUDIT_CONTROL, CAP_AUDIT_READ, CAP_AUDIT_WRITE, CAP_BLOCK_SUSPEND, CAP_CHOWN, CAP_DAC_OVERRIDE, CAP_DAC_READ_SEARCH, CAP_FOWNER, CAP_FSETID, CAP_INIT_EFF_SET, CAP_IPC_LOCK, CAP_IPC_OWNER, CAP_KILL, CAP_LAST_CAP, CAP_LEASE, CAP_LINUX_IMMUTABLE, CAP_MAC_ADMIN, CAP_MAC_OVERRIDE, CAP_MKNOD, CAP_NET_ADMIN, CAP_NET_BIND_SERVICE, CAP_NET_BROADCAST, CAP_NET_RAW, CAP_PACCT, CAP_SETFCAP, CAP_SETGID, CAP_SETPCAP, CAP_SETUID, CAP_SYSLOG, CAP_SYS_ADMIN, CAP_SYS_BOOT, CAP_SYS_CHROOT, CAP_SYS_MODULE, CAP_SYS_NICE, CAP_SYS_PACCT, CAP_SYS_PTRACE, CAP_SYS_RAWIO, CAP_SYS_RESOURCE, CAP_SYS_TIME, CAP_SYS_TTY_CONFIG, CAP_WAKE_ALARM.
When firejail drops capabilities, it removes them from the so-called capability bounding set, which acts as a mask on the capabilities that may be held by it or its children. However, per the capabilities manpage,[26] if a process has a capability in its inherited set that is not in its bounding set, it can still gain that capability in its permitted set by executing a file that has the target capability in its inherited set. As such, in addition to using the
--caps.drop=all option, for full security you must also ensure that the firejail option --nonewprivs is used (this latter option prevents any privilege escalation via execve; it is automatically set if a seccomp-bpf filter is in use,[20] and for avoidance of doubt is explicitly set by firejail's default firefox profile too).Restricting capabilities for a program like firefox is really a 'strength in depth' approach, since the browser is launched with the uid of the regular user (who will usually have no root capabilities) and nor does the firefox executable itself have any capabilities specified via extended attributes.[28] As such, we are really protecting against the a compromised browser launching other enhanced-capability applications, or (somehow) elevating its privileges to root level.
Resource Isolation via Linux Namespaces
We've mentioned a few types of Linux namespace in passing already, so now let's take a slightly more in-depth look at this important kernel technology, and how firejail makes use of it to enhance security.
In essence, namespaces wrap global system resources, such that processes inside the namespace appear to have their own isolated copy of those resources. As such, they are a major enabler for containers, lightweight virtualisation, and sandboxing.[29]
There is a degree of confusion about what exactly is meant by a 'Linux container'. Some authors take it to refer only to processes created via the lxc library, but we use it here in a broader sense, to denote any process whose resources are — to a greater or lesser extent — isolated through the use of those same kernel facilities that userspace tools like lxc rely on to do their work.
The Linux kernel currently provides seven major classes of namespace , viz.:[30][31]
- UTS namespaces : probably the simplest, these just enable containers to have their own hostnames and domain names if desired.[32] Firejail places all newly created sandboxes in their own UTS namespace by default; and you can e.g., use the
--hostname=<name>option to modify the properties of this. - Mount namespaces: the first namespace type to be implemented in Linux (in 2002), these allow containers to have their own compartmentalized 'views' of the filesystem; somewhat like chroot, but much more flexible and secure.[33] For example, as mount and umount calls don't propagate across namespaces (unless explicitly requested), it is possible to use overlay filesystems, bind mounts and the like to make parts of a container's filesystem hidden, read-only, or "amnesiac" (changes are forgotten when the container is closed). Mount namespaces are also used by PID namespaces (see next point) to provide a custom view of the special proc filesystem. Firejail makes extensive use of mount namespaces, for example, to facilitate file and directory blacklisting and whitelisting, to support the --private (amnesiac home directory) option etc. All newly created Firejail sandboxes have their own mount namespace by default (discussed in more detail below).
- PID namespaces: these are used to isolate the process IDs within a container.[34] PID numbers are remapped across a PID namespace boundary, and a process cannot see (and so, a fortiori, cannot kill etc.) processes outside its PID namespace (other than those in any child namespaces). Distinct tasks in different namespaces can have the same (numeric) PID. Firejail places all newly created sandboxes in their own PID namespace by default (within which the firejail process itself is PID 1).
- Network namespaces: these enable containers to have their own network devices, IP addresses, ARP and routing tables, netfilter rules etc.: essentially an isolated network stack.[35] This makes them very useful for containerization (e.g. running multiple web servers), but also for sandboxing. Firejail does not place new sandboxes in their own network namespace by default, but can do so when the
--net=<ifname>parameter is passed. In the configuration described later in this tutorial, we shall make use of this facility, to ensure that the "outer" X11 abstract Unix socket (see above) is inaccessible within the xephyr context. - User namespaces: these allow containers to have their own user and group ID number spaces.[36] It has been a somewhat controversial feature, because of the ability it provides for a regular, non-root user to set themselves up as root within a container, and then potentially exploit some (root-only) kernel facilities that are not yet properly namespace aware to launch an attack outside the container boundary.[37] Firejail does not place new sandboxes in a user namespace by default, but will attempt to do so if e.g. the
--norootoption is enabled (as it is in the firefox profile, for example). Note that in the user namespaces created by firejail, there is no root user present at all.[38] If, however, CONFIG_USER_NS is turned off in the kernel for security (as it will be in Gentoo by default), this particular option will just no-op if specified; the overall effect on the sandbox security (and operation) in such a case is negligible. - Control group namespaces: these allow containers to remap the control group of processes within them. It is a relatively new feature (Linux 4.6) and not currently used by Firejail (although it does make extensive use of the control groups feature itself (for example, to allow a sandboxed process to be resource-limited where desired)).
- IPC namespaces: these allow containers to isolate System V IPC objects and (since Linux 2.6.30) POSIX message queues. Firejail does not place new sandboxes in an IPC namespace by default, but will do so if the
--ipc-namespaceoption is passed. It is not used by default in the current firefox security profile.
There are two very important isolation features that firejail relies on the existence of Linux namespaces to implement, so let's discuss those next.
Comms Isolation via Network Namespaces
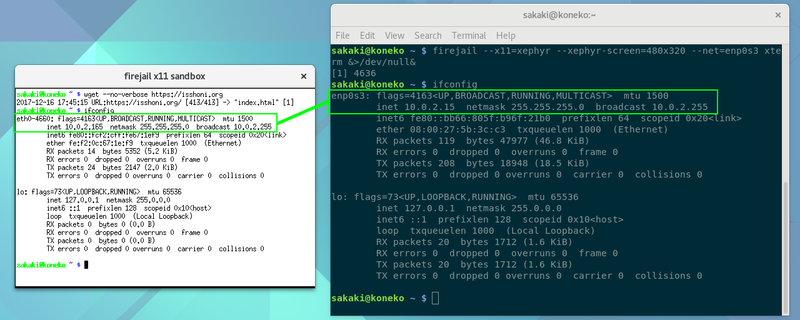
First, firejail leverages network namespaces to provide comms isolation — ensuring that sandboxed applications cannot snoop on other network traffic, set up listening server ports, launch mail spam attacks etc., even if compromised. As shown earlier, if you have a wired Ethernet adaptor, you only need pass firejail the --net=<ifname> option to use this feature.[39][40] In such a case, the sandbox is connected to the network via a macvlan device[41]; it has an address within the local network's netmask range, but runs in its own network namespace, with fully distinct distinct TCP/IP stack, routing table, MAC etc. (see above).
The screenshot below shows an example of this in action:
Notice how the host system's enp0s3 IP address (in this case, 10.0.2.15) and the sandbox's eth0-4660 IP address (here, 10.0.2.165) are on the same (10.0.2.0/24) network segment (the netmask being 24 bits, i.e., 255.255.255.0). In fact, they are both bound to the same underlying network adaptor — the very purpose of macvlan being to allow a single physical interface to have multiple MAC and IP addresses using virtual macvlan sub-interfaces. Since each sub-interface is connected directly to the underlying network, clients of a macvlan interface can still perform DHCP requests etc.
This is a convenient approach, but unfortunately it won't work with WiFi adaptors, because all access points (APs) will reject frames from a MAC address that did not originally authenticate with them. As such, an attempt to setup a second connection on a macvlan sub-interface of a wlan adaptor would cause any other (existing) connection (on the same physical adaptor, but with a different MAC) to be immediately torn down, thereby dropping the wireless connection.[42]
To get around this issue we must instead use a routed setup.[43] Under this approach (which we will leverage more fully later in the implementation section of this mini-guide), the sandbox is connected (via a veth inter-namespace tunnel [44]) to a Linux bridge, and traffic is then routed between the bridge and the default network gateway interface by netfilter rules configured in the 'outer' context. In this way, any valid network connection — whether wired or wireless — can be used to (indirectly) provide network connectivity to processes in the sandbox.
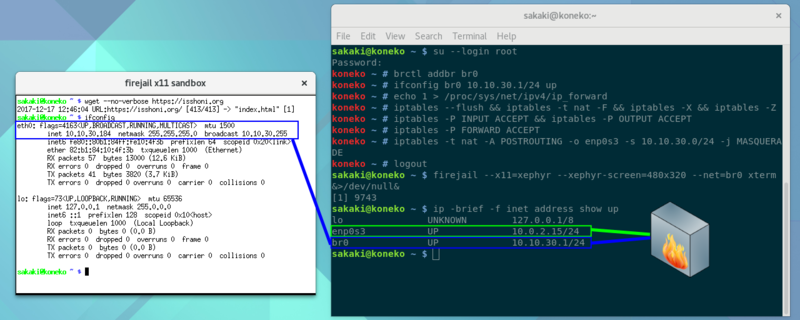
The screenshot below shows a simple routed sandbox connection in action:
In this example, a bridge (br0) is first set up outside the sandbox, and assigned a network address and netmask (here, 10.10.30.1 and 255.255.255.0, respectively). IP forwarding is turned on in the kernel, and the iptables / netfilter firewall reset to a permissive state (with all inputs, outputs and forwarding between interfaces allowed).
Although often talked about semi-interchangeably, properly speaking netfilter refers to the kernel's packet filtering framework, whereas iptables refers to a userspace tool commonly used to interface with it.[45]
Then a MASQUERADE rule is configured in the firewall (still in the 'host' context — the sandbox actually maintains its own, distinct netfilter ruleset (due to having its own network namespace), but this is not modified here).
The effect of this rule is to dynamically translate packets originating from the source network (here, the bridge, i.e., anything on the 10.10.30.0/24 segment) so they appear to come from the IP address of the enp0s3 interface (here, this happens to be 10.0.2.15, but by using MASQUERADE (as opposed to SNAT) we remove the need to cite the address explicitly in the iptables rule, which is useful where e.g., DHCP is used on the default gateway interface, making the required address dynamic).[46] The firewall also automatically activates state-matching logic to reverse the process for any reply packets. Normal traffic from the 'host' context (i.e., related to applications running outside the sandbox) is still sent and received directly (here, through enp0s3) as usual.
After that, an xterm is started inside a firejail sandbox as the regular user, with the --net=br0 parameter.
As may be seen, this causes one endpoint of a virtual Ethernet (veth) tunnel (here labelled as eth0) to be created by firejail inside the sandbox; this works just like a regular network interface (so tools like wget can use it, as shown). In the above example, an address of 10.10.30.184 has been assigned to this eth0 interface (leftmost blue box in the screenshot) (firejail chooses an address and validates it with ARP automatically — there's no need for a DHCP server etc.).
Outbound packets on eth0 are tunnelled to the matching element of the veth pair[47] which exists outside the sandbox (and which is attached to the br0 bridge by firejail; rightmost blue box).
From there, outbound packets are forwarded by the ('host' context) netfilter firewall to the default network gateway interface (here, enp0s3, IP 10.0.2.15, the green box). During this process, the transiting packets' apparent source address is rewritten (10.10.30.184 → 10.10.30.1), as a result of the MASQUERADE rule. Note that in this case, there is no reason why the default gateway could not be a WiFi (wlan) interface, rather than an Ethernet one (enp0s3) — since, unlike the macvlan approach, nothing in this configuration attempts to provision the gateway interface with more than one MAC.
Inbound reply packets, initially ingressing on the enp0s3 interface, essentially follow the above flow in reverse, eventually egressing on the eth0 interface inside the sandbox.
As a result, we achieve the strong communications isolation required. As a side benefit, because each network namespace has its own set of abstract UNIX domain sockets, firejail can make the 'outer' X11-server entirely inaccessible within the sandbox. Furthermore, it is easy to perform more fine-grained iptables-based control of the sandbox's network activity if desired (for example, by adding a rule to block any outbound connections on port 25, as a protection against mail spam) and since this is done outside the sandbox, it would be invisible to (and unchangeable by) any application running inside it.
As mentioned, because each network namespace has its own dedicated netfilter ruleset too, firejail can actually set up an additional netfilter / iptables firewall within the sandbox if you like (this operates entirely separately from the 'host' namespace netfilter / iptables firewall we have just discussed, and sandbox traffic to or from the outside world must pass through both). The option
--netfilter turns this on (and configures the sandbox firewall in an initial output-and-reply-only stance, in which e.g., STUN requests are prohibited).For avoidance of doubt, the default firefox profile specifies this option.[20]
Filesystem Protection via Mount Namespaces
The second important firejail isolation feature facilitated by Linux namespaces is filesystem protection — ensuring that sandboxed applications don't have access to private (or dangerous) libraries, files or directories, even if compromised. To do this, firejail automatically builds a on-the-fly root filesystem for each sandbox, within which a large number of localized restrictions are applied (some by default, and others as specified via command-line option and/or security profiles). As mentioned above, the key enabling technology here is mount namespaces; these allow (for example) large numbers of local bind mounts[48] to be made within the sandbox context only, in a way that is invisible to the 'host' (namespace) context.
This approach to sandbox construction is related to the venerable chroot (which we used earlier in the install), but is distinct from it. In a chroot, a sufficiently complete filesystem tree is created at (typically) some sub-location of the 'base' filing system, and then the chroot syscall is used to make this sub-location the effective root path for the calling process (and its descendants). Commonly, special system directories such as /proc, /sys and /dev are bind mounted into the subtree, prior to the actual chroot call; any locations not spanned by the subtree or its mounts become invisible to the process (and descendants) after the chroot.
Since the chroot call is (supposed to be) an irreversible containment, it is common to talk of placing a process in a 'chroot jail'.
By contrast, firejail leaves the standard root directory in place, but switches to a new mount namespace, after which the 'inside-the-sandbox' view of the root filesystem is significantly altered via various (local) mount operations. Since these changes do not (by default) propagate outside the mount namespace, the 'host' system's view of the root filesystem is unaffected.
Actually, firejail can use a chroot filesystem too, through the use of the
--chroot=<path> option. This is sometimes useful when e.g. trying out new Linux distributions. However, it isn't necessary (or, by default, used) when constructing a safe filesystem to e.g., run programs like firefox.By default, firejail modifies the baseline root filesystem in the sandbox by bind-remounting /etc, /var, /usr, /bin, /sbin, /lib, /lib32, /libx32 and /lib64 read-only. Only /home and /tmp are writable.[20][21]
This is then further modified by relevant directives in the active security profile (in our case, /etc/firejail/firefox.profile) together with any command line options passed directly to firejail itself. Firejail allows a number of protection strategies to be employed; these generally use some combination of tmpfs (memory-based temporary filesystem) mounts, bind-mounting 'dummy' files and directories over sensitive locations, and modified filesystem permissions to do their work.
For example, in the below screenshot, an xterm is started within a firejail sandbox, using the default firefox security profile:
As may be seen, starting the sandbox does not change the mount table (/proc/mounts) as visible from the 'outer' context; these remain relatively limited: 17 entries, of which 7 are mounts of, or bind-mounts of locations from, tmpfs filesystems. Within the sandbox, however, it is quite a different story — there are 200 mount table entries, of which 170 are marked as tmpfs.
This does not mean that firejail has created 163 new tmpfs filesystems; the vast majority are simply 'occluding' bind mounts (using the special dummy file and dummy directory located at /run/firejail/firejail.ro.file and /run/firejail/firejail.ro.dir respectively) to 'mask out' sensitive locations in the root tree. Because /run is itself a tmpfs (you can use
findmnt without any arguments to easily see this), the filesystem type propagates and is displayed for each such bind mount in /proc/mounts, adding one to the count each time.To better understand what is going on here, let's take a closer look at some of the filesystem-modification options that firejail offers (this is not a comprehensive list):
--read-only=<file_or_dir>When a file or directory is marked with this directive, firejail bind mounts it (citing identical source and target paths) with the MS_RDONLY flag set (as with all such operations, this bind mount is only visible in the sandbox context). Since the mount, umount and umount2 syscalls will generally be restricted by a seccomp-bpf filter, and CAP_SYS_ADMIN dropped within the sandbox (see above discussion, here and here), there is no way for the sandboxed application (even if compromised) to undo this operation (true of all the below options).--noexec=<file_or_dir>As above, but the marked file or directory is bind-remounted with the noexec, nodev and nosuid options set (see this previous discussion for an explanation of what these are).--blacklist=<file_or_dir>When a file or directory is marked with this directive, firejail bind mounts a empty, only-readable-by-root dummy file (/run/firejail/firejail.ro.file) or directory (/run/firejail/firejail.ro.dir) as appropriate on top of the specified path. This 'occludes' the original filesystem element within the sandbox, making its contents inaccessible.--whitelist=<file_or_dir>Of course, one problem with blacklisting is that anything not explicitly excluded is still allowed, and so (particularly as systems change over time) it is easy for something sensitive to get missed. Further, the name of the blacklisted file or directory is still visible within the sandbox even when the contents are occluded, which may not always be acceptable. To address this, firejail also offers whitelisting. When a file or directory is marked with this directive, firejail mounts a new tmpfs over the parent directory of the cited path (if it has not already done so due to a previous--whitelistdirective), and then bind-mounts the specified file or directory inside (at its original location). This means that everything else in the parent directory (recursively), that is not whitelisted, becomes invisible inside the sandbox. Further, while changes to whitelisted files or directories persist when the sandbox is closed, any other changes disappear (since they were performed in a tmpfs).
For example, if firejail was started with the options--whitelist=~/.configand--whitelist=~/.mozilla(and no others), then it would create a new tmpfs and mount it over the user's home (the 'parent' path ~/) (with the same permissions and ownership as the original home directory had), and then bind-mount the original ~/.config and ~/.mozilla directories inside this. Nothing else in the user's home directory would be visible.Note
In fact, the default firefox profile does something similar, albeit with a larger list of whitelisted components within ~/; most of these are hidden ('dot') paths however: the only 'regular' whitelisted directory is ~/Downloads (as may be seen in the above screenshot).--privateThis directive causes a tmpfs to be mounted over the user's home (and another over /root), with a minimal 'fresh' configuration in place. In that sense, it is similar in effect to the ~/<subpath> whitelisting performed by the default firejail profile, but is even more extreme — only the original ~/.Xauthority file is bind mounted, and otherwise new skeleton contents are provided (e.g. ~/.bashrc). As such, all changes will be discarded upon exit. In fact, the--privateoption will override any home directory whitelisting, if specified together. This can be useful if you want to e.g., access a site using a 'vanilla' browser configuration (no custom add-ons etc.), but in an 'amnesiac' manner (for example, a banking or government site).Tip
It is still possible to specify that certain files or directories be bind-mounted in the tmpfs home, if you use the--private-home=<file>,<dir>option instead.--private-bin=<file>,<file>This directive causes a tmpfs to be mounted over /bin, with only the specified binaries copied over. The new /bin is then bind-mounted over /sbin, /usr/bin, /usr/sbin and /usr/local/bin. This allows for a very restricted environment to be provided, similar to what one might setup in a old-school server chroot.
Firejail provides a large number of other facilities that we have not discussed above. For example, you can use --private-lib=<path>,<path> to build a new /lib in a tmpfs, with only the libraries necessary to run the application present (similar to --private-bin). As another example, you can specify the use of a Docker-style overlay filesystem[49] (--overlay, --overlay-named and --overlay-tmpfs options) to store all changes made to the filesystem inside a sandbox into an (potentially reusable) overlay. However, the above summary has hopefully given you a reasonable view of what firejail can do; please refer to the relevant manpages [20][21] for further information.
That concludes our high-level tour of firejail. We will now turn to consider its installation and use for sandboxing (at least as an initial application) the firefox web browser.
Prerequisites
To proceed, you will require a target system running Gentoo Linux (either the stable or testing branch is fine), with:
- a kernel that has at least the baseline configuration used on the Gentoo 'minimal install' media, with the necessary additional configuration changes made to enable an X11-based graphical desktop to run;
- although most relatively modern kernels should work, given the threat model we are trying to protect against here, a version patched against the Meltdown and (so far as possible) Spectre vulnerabilities[50] is highly recommended (see this page for a list of patched kernels, required microcode updates etc.);
- additionally, CONFIG_GENTOO_LINUX and CONFIG_GENTOO_LINUX_PORTAGE should be set;
- a working X11-based desktop (I assume GNOME 3 in what follows, but the instructions may be easily adapted for other desktops, for example Xfce4, with some minimal configuration changes);
- a Wayland-based system is also usable, provided it uses the rootless XWayland X11 server to host unported applications such as firefox (see note above);
- the buildkernel tool from the sakaki-tools overlay installed (as specified earlier in the tutorial).
For avoidance of doubt, if you have installed a GNOME-based Gentoo system using the other instructions included in this EFI Install Guide, your system is suitable (although in such a case, you may still wish to check that the version of your kernel contains the most recent Meltdown and Spectre patches, particularly if you are running on the stable branch).
Installing the Necessary Software
We'll begin by installing the necessary additional software on your machine.
Kernel
You will need to enable a number of additional kernel settings (and rebuild your kernel) in order to use firejail successfully.
In what follows, I am assuming that you know how to use the make menuconfig kernel configuration tool (which buildkernel invokes). You can find a short overview of make menuconfig in an earlier section of this tutorial (systemd, OpenRC); if you skipped over it before, you may wish to review it now (or at least, read the sub-section regarding "implementing a shorthand configuration fragment in make menuconfig" (systemd, OpenRC)), before proceeding. You may also find the material in the "Final Configuration Steps" chapter useful to review (systemd, OpenRC). Greg Kroah-Hartman's Linux Kernel in a Nutshell is also highly recommended.[51]
If you are using one, ensure that your boot USB key is inserted. Then, open a terminal window, become root, and issue:
koneko ~ #buildkernel --menuconfig
The host name you see when running these commands will obviously reflect the settings on your target PC.
Then, ensure that the following options are set (where an item is marked 'M' (make as module) in the below, it may also generally be built directly into the kernel if you prefer):
'"`UNIQ--pre-00000045-QINU`"'
Some of the options in the above list may not be immediately visible to you, if they have dependencies (also from the list) that are not initially satisfied. Accordingly, if you can't find a particular option in the location specified, try in the first instance setting all the other options that are visible to you, then come back to look for it again. Repeat this process as necessary, until all the required options have been set.
These modifications assume that you have a 'sane' baseline kernel configuration to begin with, for example, one that was derived from the Gentoo Minimal Install system kernel, and then suitably augmented to allow a graphical desktop system to run successfully.
There are many more netfilter components that you may wish to install, the set above is just an absolutely minimal list to be able to use firejail in the configuration discussed in this guide.
If you wish, you can also turn on user namespaces (see above for a brief discussion regarding the benefits and risks of so doing):
'"`UNIQ--pre-00000048-QINU`"'
Once you have made the necessary changes, save the kernel configuration and wait for buildkernel to complete compiling and installing the kernel. When it has completed, reboot your system, then follow the usual steps to unlock the LUKS partition and log in again (using GNOME) as your regular user.
Installing the Firefox Browser
With the kernel configured, we will next install the Firefox web browser.
Now, because, at the time of writing, Firefox will silently auto-download a Gecko Media Plugin binary blob on first use if the (default active) gmp-autoupdate USE flag is set,[52] I recommend you create an entry in /etc/portage/package.use/firefox to unset this flag, before proceeding (of course, this step is optional; click here to skip it).
Open a terminal window, become root, and issue:
koneko ~ #nano -w /etc/portage/package.use/firefox
and append to that file:
/etc/portage/package.use/firefoxAppend following to inhibit media codec blob auto-download# inhibit Gecko Media Plugin binary blob auto-download
www-client/firefox -gmp-autoupdate
Leave the rest of the file (if any contents pre-existed) as-is. Save, and exit nano.
Then, to install firefox itself, issue (still working as root):
koneko ~ #emerge --ask --verbose --changed-use www-client/firefox
... additional output suppressed ... assuming no errors you will see ...
Would you like to merge these packages? [Yes/No] <press y, then press Enter>
... additional output suppressed ...
This may take some time to complete, as firefox is a large, complex package with many dependencies.
In this, and in subsequent emerges calling for use of the --changed-use or --noreplace option, the emerge may exit immediately, stating "Nothing to merge; quitting" (or simply, "Total: 0 packages, Size of downloads: 0 KiB"), if the specified package is already installed (and also, in the case of --changed-use, if its USE flags have not been updated since it was last emerged). This is exactly as expected, and we have used the idiom here to avoid any unnecessary recompilation.
There is one additional minor point worth bearing in mind — if you emerge a package that is already part of your system, but only as a dependency of another installed package (and you didn't specify the --oneshot flag to emerge) then you'll be asked "Would you like to add these packages to your world favorites? [Yes/No]"; in such cases you should press y, then press Enter, to confirm.
Rebuilding your X11 Server with Xephyr Support
Once completed, the next step is to ensure your X11 server (which you originally installed earlier in the install (systemd, OpenRC)) allows the use of the Xephyr X11 server-in-a-window.
NB: for avoidance of doubt, you should complete this section, even if you are using a Wayland-based GNOME desktop.
Issue:
koneko ~ #nano -w /etc/portage/package.use/xorg-server
and append to that file:
/etc/portage/package.use/xorg-serverAppend following text to enable Xephyr support in your X11 server# enable Xephyr X11-server-in-a-window
# also build Xvfb server required by x11-wm/xpra dependency of firejail
# and also build kdrive X servers (required by Xephyr)
x11-base/xorg-server xephyr xvfb kdrive
Leave the rest of the file (if any contents pre-existed) as is. Save, and exit nano.
The xvfb USE flag is an indirect requirement of firejail, due to the latter's dependency on the x11-wm/xpra package.
Now we can re-emerge the X-server itself. Issue:
koneko ~ #emerge --ask --verbose --oneshot --changed-use x11-base/xorg-server
... additional output suppressed ...
Would you like to merge these packages? [Yes/No] <press y, then press Enter>
... additional output suppressed ...
You should also emerge the x11-misc/xsel and x11-apps/xrandr packages at this time, as we will need them (for clipboard management and display rescaling, respectively) later. Issue:
koneko ~ #emerge --ask --verbose --noreplace x11-misc/xsel x11-apps/xrandr
... additional output suppressed ...
Would you like to merge these packages? [Yes/No] <press y, then press Enter>
... additional output suppressed ...
These are both small programs, so the above emerge should not take long.
Lastly, install the tiny x11-apps/xeyes package (it provides an easy, visual way to check if an application's events are visible from another context, a useful diagnostic); and also install xlsclients (which can be used to get a list of all connected X11 applications). Issue:
koneko ~ #emerge --ask --verbose --noreplace x11-apps/xeyes x11-apps/xlsclients
... additional output suppressed ...
Would you like to merge these packages? [Yes/No] <press y, then press Enter>
... additional output suppressed ...
Installing Firejail and Required Utilities
Next, we can install the firejail program itself (together with a few other utility packages required for the setup described in this tutorial). However, before doing so, we need to alter its default USE flags, to enable inclusion of the code for X11 isolation and setuid operation for regular users.
To do so, still working as root, issue:
koneko ~ #nano -w /etc/portage/package.use/firejail
and append to that file:
/etc/portage/package.use/firejailAppend following text to enable X11 isolation in Firejail# enable X11 isolation and suid operation for regular users
sys-apps/firejail x11 suid
# requirements of firejail
x11-wm/xpra server
As mentioned above, firejail unconditionally pulls in the x11-wm/xpra package, which requires the server USE flag set — so even though we will actually be using xephyr as our X11 server, we need to set it here.
Leave the rest of the file (if it was non-blank to begin with) as is. Save, and exit nano.
Now we are ready to install firejail. Issue:
koneko ~ #emerge --ask --verbose --changed-use sys-apps/firejail
... additional output suppressed ...
Would you like to merge these packages? [Yes/No] <press y, then press Enter>
... additional output suppressed ...
This emerge may take some time to complete, as firejail (with X11 isolation active) pulls in x11-wm/xpra and its dependencies.
Next, since we will need the brctl program to setup networking correctly, install the net-misc/bridge-utils package (which supplies this utility). Issue:
koneko ~ #emerge --ask --verbose --noreplace net-misc/bridge-utils
... additional output suppressed ...
Would you like to merge these packages? [Yes/No] <press y, then press Enter>
... additional output suppressed ...
We'll also need the iptables front-end to the kernel netfilter facility. Issue:
koneko ~ #emerge --ask --verbose --noreplace net-firewall/iptables
... additional output suppressed ...
Would you like to merge these packages? [Yes/No] <press y, then press Enter>
... additional output suppressed ...
The use of these additional programs was discussed earlier.
Finally, since it will be useful to have a simple terminal window available (at least initially) inside the sandboxed environment (and gnome-terminal will not work there, by default), issue:
koneko ~ #emerge --ask --verbose --noreplace x11-terms/xterm
... additional output suppressed ...
Would you like to merge these packages? [Yes/No] <press y, then press Enter>
... additional output suppressed ...
Installing the OpenBox Window Manager
Next, as discussed previously, we must install a window manager for use within the xephyr X11 server display. Here, we'll use x11-wm/openbox, as it is relatively lightweight, but can still do everything we need 'out of the box' (feel free however to choose an alternative package, if desired).
We are using openbox with xephyr, rather than firejail's default xpra, as the latter does not work reliably in this context under Gentoo.
To install openbox, issue:
koneko ~ #emerge --ask --verbose --noreplace x11-wm/openbox
... additional output suppressed ...
Would you like to merge these packages? [Yes/No] <press y, then press Enter>
... additional output suppressed ...
Congratulations, that's all the necessary software installed!
Configuration
Next, we will configure a baseline set of files and startup services to get your X11 sandboxed browser up and running. Although complete, the following is only meant as a starting point, so feel free to modify some or all of these files, as desired, once you have your sandboxed browser system working.
Setting Up the Bridge
As discussed earlier, we need to ensure that we have a 'routing' firewall-and-bridge setup in your 'outer' ('host') context, to enable sandboxed firefox to reach the public internet, even should your target PC be using a WiFi network interface.
We'll write a short script to construct (and, when instructed, tear down) the bridge part of this plumbing first. Issue:
koneko ~ #touch /usr/local/sbin/firejail-bridge
koneko ~ #chmod 755 /usr/local/sbin/firejail-bridge
koneko ~ #nano -w /usr/local/sbin/firejail-bridge
and then enter the following text in that file:
/usr/local/sbin/firejail-bridgeSimple bridge setup/teardown script for X11-sandboxed Firejail#!/bin/bash
# Simple bridge setup/teardown script for a routed X11 firejail
# (by default, br10 on 10.10.20.1/24)
# pass argument "start" to setup bridge, or "stop" to
# tear it down
#
# Copyright (c) 2018 sakaki <sakaki@deciban.com>
# License: GPL-3.0+
# we avoid br0, br1 etc. as these may already be in use
BRIDGE="br10"
# modify if 10.10.20.0/24 subnet already in use on your machine
SUBNET_PREFIX="10.10.20"
if [[ "start" == "$1" ]]; then
# create a null bridge with address 10.10.20.1, and bring it up
brctl addbr "$BRIDGE"
ip addr add "$SUBNET_PREFIX".1/24 dev "$BRIDGE"
ip link set "$BRIDGE" up
elif [[ "stop" == "$1" ]]; then
# delete the bridge, if it exists
if brctl show "$BRIDGE" &>/dev/null; then
ip link set "$BRIDGE" down
brctl delbr "$BRIDGE"
fi
else
>&2 echo "$0: error: please use 'start' or 'stop'"
exit 1
fi
In the unlikely case that the 10.10.20.0/24 subnet is already in use on your machine, or that the br10 bridge name is already taken, modify the SUBNET_PREFIX and/or BRIDGE variables in the script as required. Most users will not need to change these settings, however.
While it is possible to create a bridge using NetworkManager's GUI or CLI,[53] the above method is more generic, as it should work whether or not NetworkManager is in use.
Next, we need to ensure that our new script is run each time the system is started up; to do so, click here to jump to the (following) instructions for use with systemd (the default), or click here to jump to the (following) instructions for use with OpenRC, as appropriate.
As an alternative to the below approach, it is possible, under both systemd and OpenRC in Gentoo, to use (executable) /etc/local.d/firejail-bridge.{start,stop} files to invoke the script. That's because any /etc/local.d/<name>.start files get run at the final phase of system startup, and any /etc/local.d/<name>.stop files get run at the first phase of system shutdown, by the local service under OpenRC; and the same thing happens under systemd (indirectly) courtesy of the /usr/lib/systemd/system-generators/gentoo-local-generator generator (installed by sys-apps/gentoo-systemd-integration, a dependency of sys-apps/systemd). However, in what follows, we will stick with the approach of using explicit unit files (systemd) or initscripts (OpenRC), since these can be straightforwardly invoked, enabled and disabled from the command line, making a system using them somewhat easier to maintain.
Creating a Persistent Bridge under systemd (Default)
To enable the /usr/local/sbin/firejail-bridge script to be run each boot under systemd, we need to write a simple unit file.[54] To do so, issue:
koneko ~ #nano -w /etc/systemd/system/firejail-bridge.service
and enter in that file:
/etc/systemd/system/firejail-bridge.serviceMinimal unit to invoke the firejail-bridge script under systemd[Unit]
Description=Set up persistent bridge interface for firejail
Wants=network.target
After=network.target
[Service]
Type=oneshot
ExecStart=/usr/local/sbin/firejail-bridge "start"
RemainAfterExit=true
ExecStop=/usr/local/sbin/firejail-bridge "stop"
[Install]
WantedBy=multi-user.target
This is broadly equivalent to specifying that the system be in runlevel >=3[55] and have the networking subsystem (e.g., net-misc/networkmanager) activated, as necessary requirements for this service to run. The service itself is marked 'oneshot', i.e., there is no persistent daemon process left running. However, we have also specified the RemainAfterExit tag, to make systemd regard the service as active, even after the invoked /usr/local/sbin/firejail-bridge script has completed. Finally, and as may easily be inferred, the ExecStart and ExecStop stanzas are called whenever the service is started or stopped, respectively.
This unit file does not need to be made executable (but should only be writeable by root).
Next, start the new service (so triggering the ExecStart action, thereby running the /usr/local/sbin/firejail-bridge script with the "start" parameter, which in turn sets up the br10 bridge itself). Issue:
koneko ~ #systemctl daemon-reload
koneko ~ #systemctl start firejail-bridge
There is no requirement that a unit file's name match that of any script or program it executes; we just do so here for simplicity. In fact, in the above command, firejail-bridge is really a shorthand for firejail-bridge.service, the complete filename of the unit we just created.
Check that the bridge has come up successfully; issue:
koneko ~ #ifconfig br10
br10: flags=4163<UP,BROADCAST,RUNNING,MULTICAST>  mtu 1500
        inet 10.10.20.1  netmask 255.255.255.0  broadcast 0.0.0.0
        inet6 fe80::c44c:68ff:fec3:99aa  prefixlen 64  scopeid 0x20<link>
... additional output suppressed ...
Of course, if you have modified the bridge's name from the default br10 (and this won't apply to most readers), then you'll need to change the parameter in the command above to match (and similarly, if you have changed its address, the inet value shown by the
ifconfig br10 command will be different; again, this won't apply to most readers).The exact details shown for the bridge (for example, its inet6 address) will of course depend on your machine specifics, but you should at least see the name and IPv4 address as above (unless you have modified either in the /usr/local/sbin/firejail-bridge script, of course).
Assuming that worked, enable the unit file, so the bridge gets setup on boot:
koneko ~ #systemctl enable firejail-bridge
Congratulations, your persistent bridge setup is now complete! Continue reading at "Setting Up a Routing Firewall", below.
Creating a Persistent Bridge under OpenRC
To run the script at system startup under OpenRC, we need to write a simple init script.[56] To do so, issue:
koneko ~ #touch /etc/init.d/firejail-bridge
koneko ~ #chmod 755 /etc/init.d/firejail-bridge
koneko ~ #nano -w /etc/init.d/firejail-bridge
and enter in that file:
/etc/init.d/firejail-bridgeMinimal service to invoke the firejail-bridge script under OpenRC#!/sbin/openrc-run
# Set up persistent bridge interface for firejail
#
# Copyright (c) 2018 sakaki <sakaki@deciban.com>
# License: GPL-3.0+
depend() {
need net
}
start() {
ebegin "Setting up bridge interface for firejail"
/usr/local/sbin/firejail-bridge "start"
eend $?
}
stop() {
ebegin "Tearing down bridge interface for firejail"
/usr/local/sbin/firejail-bridge "stop"
eend $?
}
The depend() function in the above notifies OpenRC that networking (e.g., via net-misc/networkmanager) must be activated before the firejail-bridge service can be run (and further, that our new service must be restarted, should networking be restarted while it is running). The start() function simply prints a notification, runs the /usr/local/sbin/firejail-bridge script with "start" parameter, and then notifies the user of the returned result; the stop() function does the same but passes "stop" as the parameter to our script.
Next, start the new service (so triggering the start() function, thereby running the /usr/local/sbin/firejail-bridge script with the "start" parameter, which in turn sets up the br10 bridge itself). Issue:
koneko ~ #rc-service firejail-bridge start
There is no requirement that an OpenRC service file's name match that of any script or program it executes; we just do so here for simplicity.
Check that the bridge has come up successfully; issue:
koneko ~ #ifconfig br10
br10: flags=4163<UP,BROADCAST,RUNNING,MULTICAST>  mtu 1500
        inet 10.10.20.1  netmask 255.255.255.0  broadcast 0.0.0.0
        inet6 fe80::c44c:68ff:fec3:99aa  prefixlen 64  scopeid 0x20<link>
... additional output suppressed ...
Of course, if you have modified the bridge's name from the default br10 (and this won't apply to most readers), then of course you'll need to change the parameter in the above command to match.
The exact details shown for the bridge (for example, its inet6 address) will of course depend on your machine specifics, but you should at least see the name and IPv4 address as above (unless you have modified either in the /usr/local/sbin/firejail-bridge script, of course).
Assuming that worked, add the service to the default runlevel, so the bridge gets setup on boot:
koneko ~ #rc-update add firejail-bridge default
Congratulations, your persistent bridge setup is now complete! Continue reading at "Setting Up a Routing Firewall", immediately below.
Setting Up a Routing Firewall
With the bridge component of the plumbing disposed with, we can now turn our attention to creating the routing firewall. We'll use the iptables userspace tool to configure the netfilter kernel subsystem here, to enable packets originating from a firejail sandbox (which will be connected — across network namespaces — via a veth tunnel to the host system's br10 bridge) to be forwarded with network address translation ('NAT') onward to your system's main gateway interface (related reply packets will be automatically handled too); see the earlier background material for a detailed discussion of this.
Note that these rules will 'live' in the host's network namespace, not that of the sandbox, so, if you are running a system with an existing firewall setup, then you should modify that existing configuration rather than following the instructions in this section. In what follows, we'll be setting up a very simple firewall 'from scratch' (and in a manner directed at a client, rather than a server, use case).
Issue:
koneko ~ #touch /usr/local/sbin/firejail-firewall
koneko ~ #chmod 755 /usr/local/sbin/firejail-firewall
koneko ~ #nano -w /usr/local/sbin/firejail-firewall
and then enter the following text in that file:
/usr/local/sbin/firejail-firewallSimple firewall setup script for an X11-sandboxed Firejail#!/bin/bash
# Simple configuration script for an IPv4 routing firewall
# suitable for use with a firejail sandbox on a client machine
# New input is blocked by default, and bridge traffic is
# redirected to the gateway interface, with masquerading
#
# Copyright (c) 2018 sakaki <sakaki@deciban.com>
# License: GPL-3.0+
# modify to match your particular machine's main interface
NETIF="enp0s3"
# modify if 10.10.20.0/24 subnet already in use on your machine
# (for something other than br10)
SUBNET="10.10.20.0/24"
# clear firewall state, including policies, rules and counters
iptables --flush
iptables -t nat -F
iptables -X
iptables -Z
# setup default policies, which apply in the absence of
# any contradicting explicit rule
# (here: drop any input, but allow output and forwarding)
iptables -P INPUT DROP
iptables -P OUTPUT ACCEPT
iptables -P FORWARD ACCEPT
# explicit rules
# allow any input from localhost
iptables -A INPUT -i lo -j ACCEPT
# also permit any input state matched to an existing connection
# (i.e., a reply)
iptables -A INPUT -m conntrack --ctstate RELATED,ESTABLISHED -j ACCEPT
# add any specific blocks you want here
# for example, prevent any port 25 forwarding (SMTP) from the sandbox
# to help guard against mail spam
iptables -A FORWARD -s "$SUBNET" -p tcp --dport 25 -j DROP
# dynamically translate the source address of any outbound
# traffic from the bridge subnet (and reverse for matched input)
iptables -t nat -A POSTROUTING -s "$SUBNET" -o "$NETIF" -j MASQUERADE
Substitute the name of your target PC's main network adaptor interface for enp0s3 in the above; you will have noted this name down earlier in the install. For avoidance of doubt, it is permissible for this to be a WiFi interface name, for example wlp2s0 or similar.
In the unlikely case that you chose not to use the 10.10.20.0/24 subnet for the firejail bridge (br10) earlier, modify the value assigned to the SUBNET variable in the above script as appropriate. For avoidance of doubt, most users will not need to change the default setting, however.
For simplicity, we only deal with IPv4 networking in these instructions, but it is straightforward to extend them to work with IPv6 also.
Save, and exit nano.
The above iptables script, will, when executed, first flush all existing rules from the kernel's netfilter firewall (in the 'host' network namespace), and then set up a minimal firewall which ACCEPTs all output and forwarded packets, but DROPs input packets unless they are RELATED to an already ESTABLISHED connection, or originate from the lo (localhost) interface.
In addition, to illustrate the kind of further filtering you can do, a FORWARD rule is set up to block any attempt to connect to port 25 over TCP from the firejail bridge subnet. This is a basic precaution to prevent a compromised browser attempting to send mail spam. You can of course add more filters (and other firewall rules), as you see fit.
A good starting point to learn more about iptables firewall configuration (if a little dated now) is Michael Rash's book Linux Firewalls.[57]
The last iptables line in the script sets up a nat (network address translation) rule, which looks for packets being sent out via your main network interface (i.e., $NETIF — this is enp0s3 by default in the above, but you will of course have modified this to match your system's default gateway), whose source (-s) address lies in the bridge's subnet range (by default, 10.10.20.0/24). When such packets are seen, the rule causes their source address to be rewritten (via the MASQUERADE chain) to match that of $NETIF, and state-tracking logic is simultaneously put in place to reverse the process for any reply packets.
If you have a fixed IP address on your outbound interface (not one that is allocated via DHCP), then it is slightly more efficient to use an SNAT rather than a MASQUERADE rule.[58] However, using MASQUERADE will still work in this case.
A fuller exposition of the routing firewall may be reviewed in the background reading section, above.
To enable the script to work, we need to turn on IPv4 forwarding in the kernel (and also ensure this happens every boot). To do so, issue:
koneko ~ #nano -w /etc/sysctl.conf
and modify the lines in that file that currently read:
/etc/sysctl.confLines to modify to enable IPv4 forwarding in kernel# Disables packet forwarding
net.ipv4.ip_forward = 0
to the following:
/etc/sysctl.confLines modified to enable IPv4 forwarding in kernel# Enables packet forwarding
net.ipv4.ip_forward = 1
Leave the rest of the file as-is. Save, and exit nano. Then, reload the configuration. Issue:
koneko ~ #sysctl --load
and check that the change has been taken up; issue:
koneko ~ #cat /proc/sys/net/ipv4/ip_forward
1
If the result returned is 1, as above, all is well. Next, run the script we just created to setup our desired firewall configuration. Issue:
koneko ~ #firejail-firewall
If this reports an error, double-check that you have setup all the necessary components in the kernel, as directed earlier.
Next, check that the firewall rules have been properly installed. Issue:
koneko ~ #iptables-save
... additional output suppressed ...
*nat
:PREROUTING ACCEPT [0:0]
:INPUT ACCEPT [0:0]
:OUTPUT ACCEPT [0:0]
:POSTROUTING ACCEPT [0:0]
-A POSTROUTING -s 10.10.20.0/24 -o enp0s3 -j MASQUERADE
COMMIT
... additional output suppressed ...
*filter
:INPUT DROP [0:0]
:FORWARD ACCEPT [0:0]
:OUTPUT ACCEPT [0:0]
-A INPUT -i lo -j ACCEPT
-A INPUT -m conntrack --ctstate RELATED,ESTABLISHED -j ACCEPT
-A FORWARD -s 10.10.20.0/24 -p tcp -m tcp --dport 25 -j DROP
COMMIT
... additional output suppressed ...
The output will look somewhat different from the above of course (and the numeric packet counts, inside the square brackets, may be non-zero), but you should be able to verify that the same rules are present.
If you have changed the name of the default interface (from enp0s3, or have changed the address of the bridge subnet (from 10.10.20.0/24) earlier, then verify that the output from iptables-save reflects these changes.
However, even assuming the output from iptables-save looks fine, we are not yet done, because, as things stand, the netfilter firewall will be reset the next time the system is booted.
To get around that, we need to save off the current configuration to file, and then enable a service that will reload this saved configuration automatically during startup. Fortunately, the requisite service already exists (provided as part of the net-firewall/iptables package, which we installed earlier). So next, click here to jump to the (following) instructions if you are running systemd (the default), or click here to jump to the (following) instructions if you are running OpenRC.
Create Persistent Firewall State under systemd (Default)
Begin by saving off the persistent firewall state (and ensuring it is also saved afresh on each shutdown). Issue:
koneko ~ #systemctl start iptables-store
koneko ~ #systemctl enable iptables-store
The iptables-store and iptables-restore units are automatically installed (but not, by default, enabled) by the net-firewall/iptables package under systemd. The rules are saved to the file /var/lib/iptables/rules-save, by default.
Then, enable the state-reloading service:
koneko ~ #systemctl enable iptables-restore
Congratulations, your persistent routing firewall is now setup! Now continue reading at "Setting Up Clipboard Sharing and Display Rescaling for Xephyr", below.
Create Networking Setup Script under OpenRC
Begin by saving off the persistent firewall state:
koneko ~ #rc-service iptables save
The iptables service is automatically installed (but not, by default, enabled) by the net-firewall/iptables package under OpenRC. The rules are saved to the file /var/lib/iptables/rules-save, by default.
Then, start the iptables service (which will automatically reload the saved firewall rules, and will additionally save the ruleset afresh on each shutdown), and ensure that it is automatically started at boot. Issue:
koneko ~ #rc-service iptables start
koneko ~ #rc-update add iptables default
Congratulations, your persistent routing firewall is now setup! Now continue reading at "Setting Up Clipboard and Display Rescaling for Xephyr", immediately below.
Setting Up Clipboard Sharing and Display Rescaling for Xephyr
Next, we'll set up a background service script (to be run with regular user, not root, privileges), which will address two of the main usability shortcomings encountered when running a graphical application inside a nested xephyr X11-server, specifically:
- copy and paste does not work between the xephyr and host clipboards; and
- when the xephyr window is resized, only mouse clicks within the original window boundary are accepted.
The script provided runs a main loop once per second, which will:
- sync any changes in the xephyr clipboard to the host's, if (and only if) the sentinel file ~/.main_clipboard_write_ok is present (using the xsel program, which we installed earlier);
- sync any changes in the host's clipboard to the xephyr clipboard, if (and only if) the sentinel file ~/.main_clipboard_read_ok is present (ditto); and
- propagate any changes in the xephyr outer window size to its display (using xrandr, which was also installed earlier).
Note that this 'helper' script will run outside the sandbox, and because of the filesystem protection applied by the default firefox firejail profile, the sentinel files just mentioned are not visible to, nor can they be created or deleted by, the processes running inside it.
In fact, the helper will work even if you have more than one xephyr server runnning. Note however that in this case, all clipboard changes affecting one xephyr window are propagated to all other xephyr windows unconditionally. It would be a straightforward matter to add another sentinel file to toggle this behaviour if desired (left as an exercise for the reader ^-^).
Issue:
koneko ~ #touch /usr/local/bin/xephyr-helper
koneko ~ #chmod 755 /usr/local/bin/xephyr-helper
koneko ~ #nano -w /usr/local/bin/xephyr-helper
Then copy the following contents into that file (modifying as desired):
/usr/local/bin/xephyr-helperSimple Xephyr clipboard reflector / xrandr rescaling script#!/bin/bash
#
# Reflect changes in any Xephyr window clipboard to the $DISPLAY (main)
# X server clipboard, and vice-versa; also ensure all Xephyr windows have the
# correct internal bounds (for click mapping) by perodically running xrandr
# on them.
#
# To allow bi-directional clipboard reflection, create (touch) both sentinel files:
# ~/.main_clipboard_read_ok and
# ~/.main_clipboard_write_ok
# For a more restrictive approach, create only one (or neither), as required.
#
# Should be run as the regular user, in the top-level (containing) display
# and ideally autostarted on login.
#
# Copyright (c) 2018 sakaki <sakaki@deciban.com>
#
# License (GPL v3.0)
# ------------------
#
# This program is free software: you can redistribute it and/or modify
# it under the terms of the GNU General Public License as published by
# the Free Software Foundation, either version 3 of the License, or
# (at your option) any later version.
#
# This program is distributed in the hope that it will be useful,
# but WITHOUT ANY WARRANTY; without even the implied warranty of
# MERCHANTABILITY or FITNESS FOR A PARTICULAR PURPOSE. See the
# GNU General Public License for more details.
#
declare -A CLIPBOARDS
declare -a XEPHYRS
CONTENT=""
# the following two sentinel files can be used to control
# whether the main desktop clipboard is readable (and so
# reflected into Xephyr windows) and writeable (and so
# can reflect the clipboard from Xephyr windows)
# respectively
READ_MAIN_CLIPBOARD_OK="$HOME/.main_clipboard_read_ok"
WRITE_MAIN_CLIPBOARD_OK="$HOME/.main_clipboard_write_ok"
locate_and_rescale_xephyr_displays() {
declare -a xephyrs
local display
xephyrs=($(pgrep -u $(id -u) -a Xephyr | egrep -o "[[:digit:]]+$"))
for display in ${xephyrs[@]}; do
if [[ ! " ${XEPHYRS[@]} " =~ " $display " ]]; then
# new xephyr display
# initialize it from the main display's clipboard, if allowed
if [[ -f "$READ_MAIN_CLIPBOARD_OK" ]]; then
xsel --output --clipboard --display "$DISPLAY" | \
xsel --input --clipboard --display ":$display"
fi
fi
done
for display in ${XEPHYRS[@]}; do
if [[ ! " ${xephyrs[@]} " =~ " $display " ]]; then
# closed xephyr display
unset CLIPBOARDS[$display]
fi
done
XEPHYRS=(${xephyrs[@]})
# now ensure the window size of all Xephyr displays is correct
for display in ${XEPHYRS[@]}; do
xrandr --display ":$display" &>/dev/null
done
}
snapshot_clipboards() {
local display
# X displays are of format :<number>
# we drop the prefix colon when using as an associative array key
if [[ -f "$READ_MAIN_CLIPBOARD_OK" ]]; then
CLIPBOARDS[${DISPLAY#:}]="$(xsel --output --clipboard --display "$DISPLAY")"
fi
for display in ${XEPHYRS[@]}; do
CLIPBOARDS[$display]="$(xsel --output --clipboard --display ":$display")"
done
}
set_all_clipboards_to() {
local display
CONTENT="$1"
for display in "${!CLIPBOARDS[@]}"; do
CLIPBOARDS[$display]="$CONTENT"
# update actual clipboard; note we don't use <<< here, as that
# appends a newline
# only reflect to main display if permitted
if [[ ":$display" != "$DISPLAY" || -f "$WRITE_MAIN_CLIPBOARD_OK" ]]; then
echo -n "$CONTENT" | \
xsel --input --clipboard --display ":$display" &>/dev/null
fi
done
}
reflect_changes() {
local display
for display in "${!CLIPBOARDS[@]}"; do
if [[ "${CLIPBOARDS[$display]}" != "$CONTENT" ]]; then
set_all_clipboards_to "${CLIPBOARDS[$display]}"
break
fi
done
}
# main program loop
renice -n 19 $$ &>/dev/null
while true; do
locate_and_rescale_xephyr_displays
snapshot_clipboards
reflect_changes
sleep 1
done
Save, and exit nano.
X servers actually maintain three selected elements at any given time, named primary, secondary and clipboard.[59] As written, the xephyr-helper script will only synchronize the clipboard (so, for example, middle-click-paste won't work between the sandbox and host). Again, this is easy to rectify if it bothers you.
Now, open a fresh terminal window as your regular user (leaving the root terminal window open also).
Next, if (and only if) you would like your host system's clipboard to be automatically reflected to any running firejail X11 sandbox (when changed), as your regular user issue (this step is optional):
sakaki@koneko ~ $touch ~/.main_clipboard_read_ok
Similarly, if (and only if) you would like the sandbox's clipboard to be automatically reflected to the host's (when changed), issue (again, this step is optional):
sakaki@koneko ~ $touch ~/.main_clipboard_write_ok
These files must be created (if wanted) for each regular user who will run firejail X11-isolated processes (in the respective home directory for each such user).
The script checks for the existence of the two sentinel files each time round the loop, so you can change them on the fly, or even e.g., create simple GNOME top-bar icons to turn clipboard reflection on or off in each direction (see the "Top bar script executor" shell extension, available in the GNOME Tweak Tool).
We can now try starting the script directly, to check that no immediate error is flagged. So, working as your regular user, issue:
sakaki@koneko ~ $xephyr-helper
If the script starts correctly and does not immediately terminate with an error, all is well. By default, it will produce no output. Stop it manually now, by pressing Ctrlc.
Next, we need to arrange that our script will be automatically started up in the background whenever your regular user logs in to GNOME. To do this, we'll create a simple XDG autostart file.
XDG-compliant desktops environments, such as GNOME and KDE, automatically start any *.desktop files found in the following locations:
- System-wide: ${XDG_CONFIG_DIRS}/autostart/ (by default, /etc/xdg/autostart/);
- GNOME also looks for desktop files in /usr/share/gnome/autostart/; and
- User-specific: ${XDG_CONFIG_HOME}/autostart/ (by default, ~/.config/autostart/).[60]
Still working as your regular user, issue:
sakaki@koneko ~ $mkdir -pv ~/.config/autostart
sakaki@koneko ~ $touch ~/.config/autostart/xephyr-helper.desktop
sakaki@koneko ~ $chmod 755 ~/.config/autostart/xephyr-helper.desktop
sakaki@koneko ~ $nano -w ~/.config/autostart/xephyr-helper.desktop
and place the following text in that file:
~/.config/autostart/xephyr-helper.desktopSimple .desktop file to autostart xephyr-helper script[Desktop Entry]
Encoding=UTF-8
Version=1.0
Type=Application
Name=xephyr-helper
Comment=Simple usability services for Xephyr
Terminal=false
Exec=/usr/local/bin/xephyr-helper
Save, and exit nano.
The meaning of the above keys should mostly be self-explanatory (a full list of the standard .desktop file keys may be found here).
Note that you do not need to include a X-GNOME-Autostart-enabled tuple for modern GNOME desktops,[61] contrary to what you will sometimes read.
By convention, .desktop files have their executable bit set, since they contain directions about running a program; however, this is not a hard requirement; they will work just as well if the bit is clear.
In this guide, we have chosen to follow convention and set the executable bit.
With that done, manually start the desktop file now, to check that the xephyr-helper script runs correctly. We'll temporarily (hard) link it in to the ~/.local/share/applications/ directory to allow this to be done easily from the command line (using the gtk-launch utility). Still running as your regular user, issue:
sakaki@koneko ~ $mkdir -pv ~/.local/share/applications
sakaki@koneko ~ $ln ~/.config/autostart/xephyr-helper.desktop ~/.local/share/applications/
sakaki@koneko ~ $gtk-launch xephyr-helper
sakaki@koneko ~ $unlink ~/.local/share/applications/xephyr-helper.desktop
Check that the script is running in the background successfully:
sakaki@koneko ~ $pgrep --exact xephyr-helper
21733
The actual process id ('pid') returned by pgrep will almost certainly differ on your machine; the important thing is that some pid is printed (if not, it indicates that something is most likely wrong with your .desktop file — since you managed to run the xephyr-helper script directly from the command line earlier).
Assuming the script is now running in the background, congratulations, setup of your xephyr usability helper is now complete! It will now be automatically launched in the background whenever your regular user logs in to GNOME.
You should create an (identical) ~/.config/autostart/xephyr-helper.desktop file for each regular user who will run firejail X11-isolated processes (in their respective home directory, ensuring also that the .desktop file is owned by that user, of course).
Configuring Firejail
Our next task is to modify firejail's shipped configuration file slightly, to:
- specify the initial size any xephyr window(s) should open at; and
- indicate that we also want our xephyr window(s) to be resizeable.
Switching back to your root terminal again, issue:
koneko ~ #nano -w /etc/firejail/firejail.config
and modify the section of that file dealing with xephyr settings, adding the uncommented lines as below:
/etc/firejail/firejail.configSpecifying Xephyr options for Firejail (the important lines are the uncommented ones)# Screen size for --x11=xephyr, default 800x600. Run /usr/bin/xrandr for
# a full list of resolutions available on your specific setup.
# xephyr-screen 640x480
# xephyr-screen 800x600
# xephyr-screen 1024x768
# xephyr-screen 1280x1024
xephyr-screen 1024x768
# Firejail window title in Xephyr, default enabled.
# xephyr-window-title yes
# Xephyr command extra parameters. None by default; these are examples.
# xephyr-extra-params -keybd ephyr,,,xkbmodel=evdev
# xephyr-extra-params -grayscale
xephyr-extra-params -resizeable
Leave the rest of the file as-is. Save, and exit nano.
Only lines without a leading '#' (i.e., uncommented lines) are relevant in the above. The commented lines themselves are provided for context, to help you locate the appropriate stanzas in the /etc/firejail/firejail.conf file; it is possible their content may be somewhat different on your system, depending on the version of firejail you have installed. In any event, the actual location of the new, uncommented lines in the /etc/firejail/firejail.config file is unimportant, but it helps to keep things in the appropriate place for future reference.
You can of course modify the xephyr-screen size from the above 1024x768 to something more appropriate to your system (you can specify any size that will fit on your display). Generally speaking, given that you are likely to have multiple browser windows open within your xephyr window, an initial setup just a little smaller than your 'native' screen resolution may prove to be the most useable. You can easily come back to this setting to fine tune it later.
In any event, since you have stipulated that firejail pass the -resizeable parameter to xephyr above, and since we have arranged for the xephyr-helper script to be running in the background upon login, once the sandbox has been launched you can resize (and, if you like, maximize) the xephyr window to suit your requirements, by click-dragging one of its handles with the mouse, as usual.
Creating a (Supplementary) Local Firejail Security Profile for Firefox
Next, we'll create a supplementary ('.local') security configuration profile for use with firefox. As discussed in the background reading section earlier, such a file will (if present) be sourced at the start of the main /etc/firejail/firefox.profile, and so is a good way to stipulate 'tweaks' to the shipped profile, without having to edit it directly.
Modifications in a .local profile will apply to all firejail users on the local machine.
If you want to make user-specific changes to the profile, create a (regular-user-owned) file named ~/.config/firejail/firefox.profile as follows:
~/.config/firejail/firefox.profileAdding user-specific configuration options to the firefox profile# Add your user-specific modifications here, e.g.
whitelist ~/user_specific_file_or_dir
# Source the main firefox profile
include /etc/firejail/firefox.profile
This approach can be used to make local customizations to any shipped firejail application profile.
For avoidance of doubt, there's no need to set this up file up right now — the technique is related here for future reference only.
The main change we need here is to allow access from within the sandbox to three openbox window manager configuration files; these reside in a directory (~/.config/openbox/) that is normally masked by the home directory whitelisting (filesystem protection) strategy employed by the firefox profile.
Although firejail does provide a separate profile for the openbox application itself, we avoid using it here, as:
- it is much more permissive than the /etc/firejail/firefox.profile; and
- only small changes need to be made to /etc/firejail/firefox.profile to allow openbox to work under it.
As root, issue:
koneko ~ #nano -w /etc/firejail/firefox.local
and place the following text in that file:
/etc/firejail/firefox.localCustom security profile additions for firejailed firefoxwhitelist ~/.config/openbox/rc.xml
whitelist ~/.config/openbox/menu.xml
whitelist ~/.config/openbox/autostart
While you won't need to create a custom ~./config/openbox/rc.xml, ~/.config/openbox/menu.xml or ~/.config/openbox/autostart (described here, here, and here respectively) to use firefox under openbox within an X11-firejail sandbox initially, you almost certainly will when you start using the system regularly, so it is sensible to permit access to these paths now.
Save, and exit nano.
Finally, switch back to your regular user terminal, and ensure that the relevant parent directory exists (there's no need to create the ~/.config/openbox/rc.xml, ~/.config/openbox/menu.xml or ~/.config/openbox/autostart files until and unless you explicitly need them, though):
sakaki@koneko ~ $mkdir -pv ~/.config/openbox
Creating a .desktop File for X11-Firejailed Firefox
The final configuration task is to create a .desktop file, to allow our X11-sandboxed firefox to be launched as a 'first class' application from the GNOME desktop (with a matching icon that can be docked in the 'Favourites' bar, etc.).
Although firejail does provide the firecfg desktop integration utility, it isn't sufficient for our purposes here, as we don't want to directly invoke "firejail firefox", but rather to start up firefox within the openbox window manager, inside a xephyr X11-server started by firejail. As such, we'll need to create a dedicated .desktop file for the purpose.
We'll first fetch a custom icon for the sandboxed browser, so it is easy to distinguish at a glance. The following (downloadable) icon by Frank Souza is free for non-commercial use; of course feel free to substitute your own (incidentally, the standard firefox icon is available at /usr/lib64/firefox/browser/icons/mozicon128.png, should you wish to use that instead).
Working still as your regular user, issue:
sakaki@koneko ~ $wget https://www.iconfinder.com/icons/79853/download/png/128 -O ~/Pictures/firejailed_firefox128.png
Many services such as iconfinder.com enable you to apply a license filter, so that only free reuse icons are displayed. Be careful if you intend to deploy the result within a business environment however, as many of the icons (including the above) have a 'no commercial use' stipulation.
sakaki@koneko ~ $touch ~/.local/share/applications/Firejail-Firefox.desktop
sakaki@koneko ~ $chmod 755 ~/.local/share/applications/Firejail-Firefox.desktop
sakaki@koneko ~ $nano -w ~/.local/share/applications/Firejail-Firefox.desktop
and enter the following text in that file:
~/.local/share/applications/Firejail-Firefox.desktopBaseline .desktop file for X11-sandboxed Firefox[Desktop Entry]
Encoding=UTF-8
Version=1.0
Type=Application
Icon=/home/sakaki/Pictures/firejailed_firefox128.png
Exec=env GTK_IM_MODULE=xim /usr/bin/firejail --x11=xephyr --name=firefox --net=br10 --profile=/etc/firejail/firefox.profile openbox --startup /usr/lib64/firefox/firefox %u
Name=X11-Firejailed Firefox
Comment=X11-Firejailed Firefox
StartupWMClass=Xephyr
Terminal=false
MimeType=text/html;text/xml;application/xhtml+xml;application/vnd.mozilla.xul+xml;text/mml;x-scheme-handler/http;x-scheme-handler/https;
Categories=Network;WebBrowser;
Save, and exit nano.
You have to use fully qualified paths in .desktop files, so substitute your own regular user name for sakaki in the icon path (/home/sakaki/Pictures/firejailed_firefox128.png) above. Also, if you have elected to use your own icon, use that path in preference to the one given.
In the unlikely event that you changed the bridge name (from br10) or its subnet (from 10.10.20.0/24) earlier, substitute your modified version(s) in the above file. For avoidance of doubt, most users will not have to change the defaults, however.
If you elected to create a user-local profile (as described in the above tip), be sure to modify the
--profile path (to point to /home/<username>/.config/firejail/firefox.profile) in the above file (remember, firejail is launching openbox, not your target application directly, so it is necessary to tell it the 'real' profile to load, via --profile). For avoidance of doubt, if you have just followed the main text, you do not need to modify the value given, however.Should you want to create other X11-firejailed applications on your target machine (for example, to sandbox thunderbird), then follow the same basic pattern as presented here, but be sure to give each a distinct .desktop file (incidentally, the xephyr-helper script, iptables configuration etc. is common, and does not need to be modified or duplicated when setting up additional applications).
As with the autostart .desktop file we set up earlier, most of the above keys should be self-explanatory (a full list may be found here). However, there are a few points worth clarifying:
- As just described, we stipulate a custom Icon, so that the protected application may easily be distinguished.
- The Exec stanza is fairly complex. We'll unpack that separately, below.
- We specify that the application belongs to the Xephyr StartupWMClass — this ensures that if multiple instances are launched, they are don't all show up as separate icons in the dock, and that the desktop window-switcher groups them all together.[62]
- We notify a sensible set of MimeTypes the program can handle (to allow the desktop to suggest it when e.g. a file of matching type is double-clicked).
Let's now look at the Exec stanza in more detail:
- We use the env program[63] to launch firejail in a modified environment: specifically, we set GTK_IM_MODULE=xim to specify the use of the (legacy, but always installed) X input method[64] (you can replace this with another framework, such as fcitx, if you have it emerged). We need to do this, because otherwise IBus will be chosen by default, which unfortunately does not work with firejail when (as here) the network namespace feature is in use.[65]
- firejail is invoked with the
--x11=xephyroption (to use a dedicated X11 server, as discussed earlier). - The
--name=firefoxoption specifies the sandbox's name. This makes it easy to invoke firejail to perform operations on the running sandbox (from a regular-user command prompt on the 'host' desktop; see the firejail manpage[20] for more details; some examples are also given later in this document). (Incidentally, there is no requirement that the sandbox name match that of the application, it can be anything you like. Unnamed sandboxes can still be operated on, by pid.) - The
--net=br10option instructs firejail to create a new network namespace for the sandbox, then connect it via a veth inter-namespace tunnel to the br10 bridge (again, as discussed earlier). - Since our underlying target program is actually firefox, but we are starting openbox as the 'top level' sandbox application, we explicitly specify the firejail profile (via
--profile=/etc/firejail/firefox.profile), to prevent the (less-restrictive) /etc/firejail/openbox.profile being auto-selected instead. - The final part of the invocation actually launches openbox; the remainder of the arguments are then passed along to it. Here, we use
--startup /usr/lib64/firefox/firefox %u, so that when openbox runs, it in turn starts up firefox, as desired (you can use the same pattern if creating other .desktop files for different applications). Note that the%uis expanded during the .desktop file handling,[66] to the URL that caused firefox to be invoked (most commonly, this will be empty).
With the .desktop file in place, congratulations, configuration of your X11-firejailed firefox is now complete!
Testing and Use
In this section, we'll first run briefly through some tests with your new sandboxed browser (which will also be useful as a familiarization exercise). Following that, some brief miscellaneous tips and troubleshooting notes conclude the mini-guide.
Testing your X11-Sandboxed Firefox
To check that all the startup components are working as they should, first save any other work in progress, then log out and reboot your machine (following your standard procedure to enter the LUKS passphrase etc. when prompted). Next, log in again as your regular user to GNOME (using a standard X11 or Wayland session, as appropriate to your setup).
Having done so, make sure that your original firefox is not running (if it is, close it), then click on the Activities label on the top-right of your screen (or press the Windows key), and type firefox into the search box. You should see both the new and original X11-sandboxed icons visible:
Right-click on the (new) icon, then select Add to Favourites. Press Esc, then click on the Activities label again (or press the Windows key). You should see that your new icon is now present in the left-hand dock, at the bottom. You can drag it slightly out to the right while holding down the left mouse button, then up, to position it within the dock as desired [67] (release the left mouse button when done):
Then, click on your new ("X11-Firejailed Firefox") icon in the dock. You should see that a window entitled "firejail x11 sandbox" opens (this is the xephyr frame, a standalone "desktop-in-a-window"), with the initial dimensions that you specified in /etc/firejail/firejail.conf, above. It will be filled (at least initially) with a black background colour. Then, a firefox browser window should almost immediately open (automatically) inside this frame. The exact layout you see will obviously depend upon your setup, but should look something like the below:
You can now do some basic testing on your new setup.
To begin with, try browsing to a few sites as you would normally. Note that if you have used firefox before on your target machine, then any previous bookmarks, browsing history etc., will be available inside the sandbox, because the necessary cache and configuration files locations are whitelisted in /etc/firejail/firefox.profile. Media playback and (existing, installed) add-ons should be functional too.
Try browsing to a site like YouTube, and verify that video (and audio) playback works without glitches, with a similar quality level to your 'host' desktop:
Next, try moving and resizing the xephyr window itself on your main desktop; you should also be able to maximize it if you like. Check that after any such resize, you can still click on (and, e.g., maximize etc.) firefox windows within the xephyr frame (this should be possible, due to our xephyr-helper script):
The xephyr window acts like a mini-desktop (thanks to openbox). Verify that you can open multiple browser windows inside the sandbox (click on the 'burger stack' menu in firefox, then New Window); and check that these windows can be moved around, resized, maximized, closed etc. at will (note that you can of course still use multiple tabs per firefox window, as well):
on the (black) background area inside the xephyr window, to bring up an openbox context menu. Be aware that the menu displayed is simply the shipped default (you can modify it by creating ~/.config/openbox/menu.xml if you like), and so many of the applications shown either won't be installed on your system, or will fail to start due to firejail's sandbox restrictions. Nevertheless, you should be able to run xterm (a simple terminal emulator) and nautilus (GNOME's file browser) via the menu, as shown below:
If your host GNOME desktop is using Wayland (rather than X11), then be aware that any (permitted) GNOME application (such as nautilus) will actually launch outside the xephyr frame. However, they will still 'see' the filesystem inside the sandbox. Native X11 applications (such as xterm) will always launch inside the xephyr window, however.
You can use these two applications to explore the limited filesystem visible within the sandbox — you should find that most of the existing directories in your $HOME are invisible. However, by default the ~/Downloads is whitelisted, and so its contents are visible both inside and outside the sandbox. Check that you can download a file from firefox into this directory (it is the default for firefox), and then open it on your 'host' desktop:
Despite the name, you can of course also use the ~/Downloads directory to place files you want to upload to a website, so that they are visible to the firejailed browser. Alternatively, you can use firejail's file copy commands, as described below.
Next, verify that (most) other locations in your home directory are off-limits, by creating a file ~/host-test outside the sandbox, and another ~/sandbox-test inside it. Neither should be visible from the other context, as shown below:
Furthermore, the file ~/sandbox-test will be deleted when the sandbox is closed, since it has been created in a tmpfs (see discussion above).
Next, assuming you chose to create the sentinel files ~/main_clipboard_write_ok and ~/main_clipboard_read_ok earlier, you should verify that clipboard sharing is working. Select some text in one of your browser windows inside the sandbox, and try pasting it into an application on your 'host' desktop as you normally would (the operation should succeed). Then, try it in the reverse direction (copying from an application on the 'host', and pasting into an application in the sandbox; this should also work):
This is a very useful facility, but if you leave it turned on (via the sentinel files) be wary of clipboard snooping or injection exploits, which may be launched from a compromised browser.
One reasonable compromise between convenience and security here, is to create a small shell script, which simply touches the two sentinel files for you, then deletes them again after a short delay (say, five minutes). You can then add an icon to GNOME's top-bar (via the "Top bar script executor" shell extension, available from the GNOME Tweak Tool) to run it. In that way, you can easily turn on clipboard sharing temporarily when your workload requires it, but it will default to being safely off.
Finally, open an xterm within the sandbox (via the openbox context menu as above), and therein issue (as your regular user) xeyes&. The xeyes program will try to intercept mouse events, and so move the 'eyes' to track your cursor. Next, use the move the cursor across and then out of the sandbox window. You should find that the 'eyes' track your cursor up to the edge of the xephyr frame, but no further (this is a quick, although not complete, way to check that X11 events outside the sandbox are indeed isolated from programs running within it):
If you run xeyes on your 'host' desktop, you'll find it can follow the cursor both within host windows (if running Wayland however, only those windows relying on the XWayland server will be 'visible'[14]) and within the xephyr sandbox. This is as expected; the xephyr X11 server has its own event loop (and firejail arranges so that the host's X11 sockets are inaccessible to it), but xephyr itself is just another X11 application from the point of view of the 'host' desktop. Mouse events destined for the xephyr window get handled first by the host desktop's X11 server (and so are visible to an xeyes running in the 'host' context), before being passed down to the xephyr X11 server.
That concludes the tests — if you have got this far, almost certainly your system's other sandboxing features are working correctly too (e.g., program blacklisting etc.), but, feel free to try these out for yourself, per the examples shown in the background reading section earlier (for example, you could try to su to root inside the sandbox xterm, to check that this is disallowed, etc.).
Assuming all the above tests were successful, then congratulations, you have successfully installed an X11-firejailed firefox browser on your system! Use this for all your general web surfing going forward, and you'll benefit from significantly enhanced security against a range of possible browser-based exploits.
You can now continue reading below for a few additional usage tips, or alternatively, to rejoin the main guide, please click here (systemd) or here (OpenRC).
If however you experienced some problems, then please refer instead to the "Troubleshooting" section (below).
Miscellaneous Hints and Tips
The following is a miscellaneous list of hints and tips that you may find useful. It should be regarded as a 'work in progress'; feel free to contribute! The points are listed in no particular order.
- You should install a selective script blocker add-on such as NoScript or uMatrix in your browser as soon as practicable. The best defence against exploit code is not allowing it to run in the first place.
- Also consider using this user.js configuration file for firefox, to harden the browser settings and make it more secure (there is also a less-locked-down "relaxed variant", which is very useable on a day-to-day basis).
- If you like, you can easily activate firejail protection for all supported applications, by running (as root, or using sudo) the firecfg utility.[68] Once this has been done, clicking on the icon of a supported program (or launching it from the command line) will automatically start it within a sandbox. Note however that, by default, you won't get any X11 sandboxing of graphical applications launched this way (to do that, you need to set up an appropriate .desktop file, patterned on the one we created for firefox, earlier).
- If you attempt to launch a standard firefox window (in the 'host' desktop) whilst the sandboxed version is open, it will fail, because by default the newly launched application will try to connect to the running instance, only to be barred due to firejail's protection (even if you use the --no-remote or --new-instance options). The solution is either to: a) close your xephyr window while you use your host desktop browser, or b) start your new browser in 'amnesiac' mode (see below), or c) invoke firefox to open inside the existing sandbox context (which we have named "firefox"). As an example of c), you could issue (as your regular user):
firejail --join="firefox" firefox --new-window "https://www.gentoo.org", to open the Gentoo homepage in a new window inside the sandbox (xephyr frame). - Similarly, if you try to launch two instances of the "X11-Firejailed Firefox" application, it will not work. You can open as many browser windows as you like inside the xephyr window however, and that (outer) window can be resized to be as large as you like.
- If you want to quickly launch a browser in 'vanilla' state (no plugins, history etc.; the option b) just discussed) you can do this by issuing (as your regular user) e.g.,
firejail --private --dns=8.8.8.8 firefox --no-remote.[69] This will open a browser window on your main desktop, and will work even if you have an X11-sandboxed version running. It is useful if you want to e.g. access a trusted site (for banking, say) but you don't completely trust the plugins etc. you use might employ for day-to-day browsing. The new browser instance will not be running in an X11 sandbox (so you have full copy/paste/drag/drop etc. available) but is started under firejail, with an empty (tmpfs) /root/ and skeleton ~/ directory, which will be discarded when the browser is closed — so the setup is reasonably 'amnesiac'.- There are useful variants of the above, such as starting with a copy of your ~/.mozilla directory in place, using separate (preserved) directories as 'home' in different contexts (such as for work use, home use) etc. Refer to the firejail manpage[20] for further details.
- You can get a list of all running sandboxes with
firejail --list, and a process tree for each sandbox withfirejail --tree(issued as your regular user via a terminal on the 'host' desktop).[70] - You can 'enter' the context of an existing sandbox from outside, by using firejail's
--joinoption. For example, if you have an "X11-Firejailed Firefox" window open, issuing:firejail --join="firefox"from a terminal window on the 'host' desktop would will open a bash shell inside the sandbox (this is a useful alternative to xterm).[71] The same approach can also be used to launch a graphical application inside an existing xephyr sandbox, as above. - In addition to using the ~/Downloads directory to pass files in and out of the sandbox, you can explicitly copy files in and out from a (regular user) command prompt on the host, using
firejail --put="firefox" <file> <path_in_sandbox>andfirejail --get="firefox" <path_in_sandbox> <file>, respectively (the location of <file> is the current working directory).[20] - openbox is a full-blown window manager with an extensive community. You can easily customize the background, startup applications, context menu contents and more, by editing its xml configuration files (see above).
There are many other capabilities of firejail that I have not touched on in this guide, such as e.g. imposing resource limits on processes (bandwidth, CPU time etc.), auditing security profiles, integration with AppArmor and more. I highly recommend that you take a moment now to read the firejail manpage and on-line documentation.
When you're ready to rejoin the main guide, please click here (systemd) or here (OpenRC).
Troubleshooting
If you are having difficulty getting your X11-Firejailed Firefox running properly, the following troubleshooting hints may help (please note, this is by no means a comprehensive list).
A relatively common issue is that the newly created, X11-firejailed browser appears to start up OK, but then can't load web pages (has no network connectivity), so we'll discuss that first:
- Before doing anything else, verify that you can successfully run (as the regular user) a 'vanilla' instance of firefox (when no sandboxed instance is running) on your 'host' desktop, and use it to view web pages. If you can't, you have a fundamental system problem, outside the scope of this mini-guide — rectify that first, and then retry.
- Assuming that does work, however, close your 'host' instance of firefox, and then try running
firejail firefoxfrom the command line, working as the regular user on a terminal launched from the 'host' desktop. This won't get you any X11 sandboxing or network isolation of course, but it should work (and allow browsing) — if not, it suggests that something is wrong with your firejail installation, most likely due to some missing kernel configuration options. Double check these (see above), recompile your kernel (and reboot) if necessary, and try again. - However, if the previous test worked, but you are still unable to connect to the web from a browser running inside a full (xephyr) sandbox, this suggests you have an issue with the bridge or iptables routing. First, make sure that your persistent bridge is available and has a valid IP address (for most users, this will be br10 and 10.10.20.1/24, respectively), by using ifconfig (or similar tool). If the bridge isn't listed, check that your firejail-bridge service is running (see above), and that the /usr/local/sbin/firejail-bridge script runs without error, if invoked standalone.
- However, if your bridge is present, next check that forwarding is enabled in your kernel. Run
cat /proc/sys/net/ipv4/ip_forwardand check that the result is1, if not, set up your /etc/sysctl.conf file correctly, then reload it (instructions here). - Moving on, if your bridge is up, and IPv4 forwarding is enabled, but you still have no connectivity, the most likely remaining suspect is the iptables-based NAT routing, by means of which packets appearing on the br10 bridge get sent out on your host's main network interface. Accordingly, check next that your iptables rules have been set up properly: run (as root)
iptables-saveand examine the output (see this earlier discussion). In particular, ensure that the interface listed in the MASQUERADE rule really is that of your main IP interface (the one through which your default gateway is reached; you can find this usingip route show, and looking for the entry marked default). If it is not (for example, the iptables-save output includes something like-A POSTROUTING -s 10.10.20.0/24 -o enp0s3 -j MASQUERADE, but your default interface as reported byip route showis something different, i.e., not enp0s3), fix this in the /usr/local/sbin/firejail-firewall script (as directed earlier), then invoke the (firejail-firewall) script once more (remember also to save off the new firewall rules if you are successful, and also make sure that you have the necessary rule-reloading service enabled, so any changes are persistent; see above (ff) for details). - If, having done all that, you still can't connect inside the xephyr sandbox, double check that the correct bridge name (by default, br10) has been used (for the
--netparameter) in the ~/.local/share/applications/Firejail-Firefox.desktop file. If not, fix it, close the sandbox window, and then launch the "X11-Firejailed Firefox" application again. You should be able to access the web now.- NB: if you elected to change either the default bridge name (from br10) or the default bridge address / subnet (from 10.10.20.1/24 earlier, make sure that these are used consistently inside the /usr/local/sbin/firejail-bridge, /usr/local/sbin/firejail-firewall and ~/.local/share/applications/Firejail-Firefox.desktop files).
- If you still can't connect, the obvious answers are exhausted — I'm afraid you'll have to dig a bit deeper with terminal tools inside the sandbox, to diagnose your problem.
A few other (miscellaneous) issues are commonly encountered:
- If you can successfully launch the (xephyr) sandboxed browser, and view web pages using it, but find that strange things happen when you resize the xephyr window (for example, clicks seem to get ignored), then you need to ensure that your xephyr-helper script is running. Run
pgrep --exact "xephyr-helper"to check this (as noted earlier). If you find it isn't running, make sure you have set up the ~/.config/autostart/xephyr-helper.desktop file, and also check that you are able to run the helper directly without errors (as discussed earlier). Remember that an autostart entry needs to be set up for each user on the machine that wishes to run X11-sandboxed firefox.- On Wayland systems, you may find that your (host) display server locks up when you try to resize any xephyr windows (particularly if you are using a multi-GPU system). If this happens to you, comment out the
xephyr-extra-params -resizeableline in /etc/firejail/firejail.config (discussed above), and try again.
- On Wayland systems, you may find that your (host) display server locks up when you try to resize any xephyr windows (particularly if you are using a multi-GPU system). If this happens to you, comment out the
- If you are unable to copy and paste between the 'host' desktop and the sandbox (or vice versa), ensure in the first instance that the xephyr-helper script is running, as just discussed. If it is, make sure you have also created (in the 'host' context, as your regular user) the files ~/.main_clipboard_read_ok and ~/.main_clipboard_write_ok, as appropriate to your desired policy.
- By default, 'middle-click' paste doesn't work between sandbox and host, although you can easily modify the xephyr-helper script to enable this (see above). Drag and drop doesn't work either (making that work is possible too, but a little more tricky).
- If the xephyr window comes up OK, and you can e.g. open an xterm within it, but firefox itself won't start, make sure that you don't have another firefox instance already running on your system (use
pgrep firefoxto check); if you find you do have another, shut it down first (as discussed above) (if you can see no window to close, usepkill -9 firefoxto remove any lingering rogue processes that an earlier invocation of the browser may have left behind).
As mentioned, once you have tracked down the problem, refer to the appropriate section of the guide above to fix it, then proceed to test again. You can also try posting a request for help to forums.gentoo.org, or, if you believe what you are seeing is a bug, open an issue with the firejail project.
Good luck! To rejoin the main guide, please click here (systemd) or here (OpenRC).
Notes
- ↑ Congleton, N. "Protect your System. Run Your Browser in Firejail"
- ↑ SANS Internet Storm Center: Stearns, W. "Ongoing Interest in JavaScript Issues"
- ↑ Cimpanu, C. "Mozilla Confirms Web-Based Execution Vector for Meltdown and Spectre Attacks"
- ↑ Vaughan-Nichols, S. J. "How the Meltdown and Spectre Security Holes Fixes Will Affect You"
- ↑ You can of course block all scripts unconditionally, but this isn't really a valid option for most people's daily workflow.
- ↑ NB, in this context, while we are not referring to the userspace lxc interface for process containment (see e.g., this introduction), the firejail application which we'll be using does leverage many of the same kernelspace facilities that lxc relies on, so the use of the term 'container' is (I believe) justified.
- ↑ Schürmann, T. Linux Magazine "The Jailer"
- ↑ Mozilla Bugzilla: "Firefox Wayland Port"
- ↑ ArchLinux Wiki: "Wayland"
- ↑ Since this will protect other non-Wayland apps running within the shared XWayland instance from X11-based attacks launched from a compromised firefox instance. Wayland apps (e.g. gnome-terminal) are already protected from this vector of course, but firejail's other protections (seccomp-bpf, namespaces etc.) are still useful, even in that case.
- ↑ Obviously, the relationship between X11 server and graphical desktop need not be one-to-one, but generally it will be so in the simple case.
- ↑ In non-Wayland mode, of course.
- ↑ Rutkowska, J. "The Linux Security Circus: On GUI Isolation"
- ↑ 14.0 14.1 Bugaev, S. "How to Easily Determine if an App Runs on XWayland or on Wayland Natively"
- ↑ xlsclients manpage
- ↑ Floser, M. "Rootless Xwayland Server Integration into KWin"
- ↑ This trick cannot be used to target the windows of native Wayland applications, however.
- ↑ See /etc/gdm/Xsession — (grep for xhost).
- ↑ Snowden, E. (tweet) "If you're serious about security <...>"
- ↑ 20.0 20.1 20.2 20.3 20.4 20.5 20.6 20.7 20.8 firejail manpage
- ↑ 21.0 21.1 21.2 firejail-profile manpage
- ↑ Firejail Documentation: "X11 Guide"
- ↑ Unix & Linux Stack Exchange Forum: "What does the @ Symbol Denote in the Beginning of a UNIX Domain Socket Path in Linux?"
- ↑ kernel.org: "SECure COMPuting with Filters"
- ↑ Firejail Documentation: "Linux Capabilities Guide"
- ↑ 26.0 26.1 26.2 capabilities manpage
- ↑ That is, via
caps.drop allin /etc/firejail/firefox.profile. - ↑ nachoparker "Sandbox your Applications with Firejail"
- ↑ Kerrisk, M. "Namespaces in Operation, Part 1: Namespaces Overview"
- ↑ Firejail Issue 1347, Comment by Ferroin "Response to: Implications of CONFIG_USER_NS"
- ↑ Rosen, R. "Resource Management: Linux Kernel Namespaces and cgroups"
- ↑ Linux Kernel Mailing List: Hallyn, S. E. "UTS Namespaces: Introduction"
- ↑ linux-fsdevel Mailing List: Viro, A. "Per-Process Namespaces for Linux"
- ↑ Emelyanov, P. and Kolyshkin, K. "PID Namespaces in the 2.6.24 Kernel"
- ↑ User corbet on LWN.net "Network Namespaces"
- ↑ Kerrisk, M. "User Namespaces Progress"
- ↑ Arch Linux Bug Tracker: "add CONFIG_USER_NS"
- ↑ As such, the risk lies not so much with firejail's
--norootoption itself, but rather with the need to turn on CONFIG_USER_NS in the kernel to be able to use it, which in turn potentially opens the door for exploitation by other software. - ↑ Firejail Documentation: "Basic Usage: Direct Network Setup"
- ↑ Note that there's a little more to it than that of course: you would need to at least specify firejail's
--netfilteroption to have a default input-drop-stance firewall created (inside the new network namespace), and then add your own custom rule to this, to block undesired traffic (e.g., outbound to port 25). Alternatively, this filtering can be done (in a forwarding setup) in the host system's netfilter/iptables ruleset, as discussed later in the text; this latter approach is slightly more secure. - ↑ Makam, S. "Macvlan and IPvlan Basics"
- ↑ SuperUser Forum: "How to Configure macvlan Interface for Getting the IP?"
- ↑ Firejail Documentation: [https://firejail.wordpress.com/documentation-2/basic-usage/#routed "Basic Usage: Routed Network Setup"]
- ↑ veth manpage
- ↑ Ellingwood, J. "A Deep Dive into Iptables and Netfilter Architecture"
- ↑ Rupp, K. "NAT - Network Address Translation"
- ↑ Lowe, S. "Introducing Linux Network Namespaces"
- ↑ Unix & Linux Stack Exchange Forum: "What Is a Bind Mount?"
- ↑ kernel.org; Brown, N. "Overlay Filesystem"
- ↑ Raspberry Pi Blog: Upton, E. "Why Raspberry Pi Isn't Vulnerable to Spectre or Meltdown" — a very readable architectural description of the 'speculation' family of attacks, even though written from a non-x86_64 perspective.
- ↑ Kroah-Hartman, Greg. Linux Kernel in a Nutshell (ebook). O'Reilly, 2006
- ↑ Gentoo Forums: "Policy question re Firefox binary blob auto-download"
- ↑ Ask Xmodulo Forum: "How to configure a Linux bridge with Network Manager on Ubuntu"
- ↑ Unix & Linux Stack Exchange Forum: "How to Write Startup Script for systemd"
- ↑ Arch Linux Wiki: "systemd: Mapping Between SysV Runlevels and systemd Targets"
- ↑ Big Elephants Blog: "Writing Your Own Init Scripts"
- ↑ Rash, Michael Linux Firewalls: Attack Detection and Response with iptables, psad, and fwsnort No Starch Press, 2007
- ↑ Unix & Linux Stack Exchange Forum: "Difference between SNAT and Masquerade"
- ↑ xsel manpage
- ↑ Arch Linux Wiki: "Desktop Entries: Autostart"
- ↑ GitHub Gist: najamelan "Gnome Desktop Entry Format extensions - bootlegged documentation"
- ↑ Ask Ubuntu: "What Represent the StartupWMClass Field of a .desktop File?"
- ↑ env manpage
- ↑ X Consortium: "The Input Method Protocol"
- ↑ Firejail Documentation: "Known Problems: Cannot Connect to IBus-Daemon in a New Network Namespace"
- ↑ freedesktop.org "Desktop Entry Specification: The Exec Key"
- ↑ Ask Ubuntu: "How to Drag and Move Icons in the GNOME-Shell Favourites Bar?"
- ↑ firecfg manpage
- ↑ Firejail Documentation: "Firefox Sandboxing Guide: High Security Browser Setup"
- ↑ Firejail Documentation: "Basic Usage: Listing Sandboxes and Processes"
- ↑ Firejail Documentation: "Basic Usage: Joining an Existing Sandbox"

