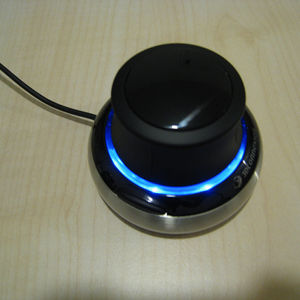
SpaceNavigator
This article is written for the SpaceNavigator but it should work with other 3D mouse in the Space-series produced by 3Dconnexion. Only applications that support 3D mouse device can work properly with this driver. For now, only blender support it in the portage tree.
Kernel configuration
To be able to use spacenavd used in this article you need to compile your kernel with input evdev support as well as with support for Logitech HID devices and Physical Interface Device support.
Device Drivers ->
   Input Device support ->
      <*>   Event interface
   HID support ->
      USB HID Support ->
         [*]   PID device support
      Special HID drivers ->
         <M>   Logitech devices
Pitfalls
The following troubles are rather easy to run into (and to get out of).
No response
The device cannot be managed by both Xorg and the spacenavd daemon at the same time, see modes of operation. If you get no reaction with Xorg verify that spacenavd is not running. Respectively, if the device doesn't work in Blender make sure the daemon is running and xinput is not listing the device.
Orientation / inverted axes
The place where the cable leaves the body marks the top orientation of the device as with a normal 2D mouse. If you position the device in a different position inverting certain axes may be necessary to obtain expected behavior.
Modes of operation
SpaceNavigator can be operated in two mutually exclusive modes:
Xorg xinput device
xf86-input-evdev
You can use your SpaceNavigator as a mouse without any additional drivers except for Kernel Event Support and xf86-input-evdev with
/etc/X11/xorg.conf.d/20-spacenavigator.confSection "InputClass"
Identifier "evdev 3Dconnexion"
MatchProduct "3Dconnexion|SpaceNavigator|Space Navigator"
Driver "evdev"
Option "Mode" "Relative"
Option "ConstantDeceleration" "20" # decrease initial velocity to usable value
EndSection
Once you restart Xorg and unplug-replug the device you can list supported properties and current values:
root #emerge --ask x11-apps/xinputuser $xinput --list-props '3Dconnexion Space Navigator'Device '3Dconnexion Space Navigator':
Device Enabled (132):
Coordinate Transformation Matrix (134): 1.000000, 0.000000, 0.000000, 0.000000, 1.000000, 0.000000, 0.000000, 0.000000, 1.000000
Device Accel Profile (256): 0
Device Accel Constant Deceleration (257): 10.000000
Device Accel Adaptive Deceleration (258): 1.000000
Device Accel Velocity Scaling (259): 10.000000
Evdev Axis Inversion (260): 1, 1
Evdev Axes Swap (262): 0
Axis Labels (263): "Rel X" (142), "Rel Y" (143), "Rel Z" (275), "Rel Rotary X" (276), "Rel Rotary Y" (277), "Rel Rotary Z" (278)
Button Labels (264): "Button 0" (273), "Button 1" (274), "Button Unknown" (250), "Button Wheel Up" (138), "Button Wheel Down" (139)
Evdev Middle Button Emulation (265): 0
Evdev Middle Button Timeout (266): 50
Evdev Wheel Emulation (267): 0
Evdev Wheel Emulation Axes (268): 0, 0, 4, 5
Evdev Wheel Emulation Inertia (269): 10
Evdev Wheel Emulation Timeout (270): 200
Evdev Wheel Emulation Button (271): 4
Evdev Drag Lock Buttons (272): 0
These keys can be used to alter the current configuration, for example:
user $xinput --set-prop '3Dconnexion Space Navigator' 'Device Accel Constant Deceleration' 10
user $xinput --set-prop '3Dconnexion Space Navigator' 'Evdev Axis Inversion' 1 1
xf86-input-joystick
The evdev approach above provides an absolute pointer that always re-centers on the screen. For a relative pointer that works more like a pointing stick, use xf86-input-joystick instead.
/etc/X11/xorg.conf.d/20-spacenavigator.confSection "InputClass"
Identifier "SpaceNavigator"
MatchProduct "3Dconnexion|SpaceNavigator|Space Navigator"
Driver "joystick"
# X: move left/right - horizontal scroll
Option "MapAxis1" "mode=relative axis=+5zx deadzone=15000"
# Y: move up/down - vertical scroll
Option "MapAxis2" "mode=relative axis=+5zy deadzone=15000"
# Z: pull up / push down - right / left click
Option "MapAxis3" "mode=relative keyhigh=251 keylow=252 deadzone=2000"
# RY: tilt up/down - move pointer
Option "MapAxis4" "mode=relative axis=+5y deadzone=500"
# RX: tilt left/right (inverted) - move pointer
Option "MapAxis5" "mode=relative axis=-5x deadzone=500"
# RZ: twist left/right - horizontal scroll
Option "MapAxis6" "mode=relative axis=-10zy deadzone=5000"
# Button 2 - right click
Option "MapButton2" "button=3"
EndSection
The mouse buttons on the Z axis are mapped to unused keycodes which can be configured through Xkb as mouse keys:
    key <I251> {         [     XF86User1KB ] };
    key <I252> {         [     XF86User2KB ] };

    interpret XF86User1KB+AnyOfOrNone(all) {
        action= PtrBtn(button=1);
    };
    interpret XF86User2KB+AnyOfOrNone(all) {
        action= PtrBtn(button=3);
    };
Mouse keys then can be enabled using xkbset:
user $xkbset mousekeys
user $xkbset exp \=mousekeys
With the above configuration it is quite usable as a mouse, only thing missing is middle click, not sure where to map that.
Firefox
- Ctrl + left click opens links in a new tab as an alternative to middle click.
- Shift + scroll navigates the history
- Ctrl + scroll zooms the page
Supported applications
Blender
To enable SpaceNavigator support for Blender you need to enable use flag "ndof"
/etc/portage/package.usemedia-gfx/blender ndof
or
/etc/portage/package.use/media-gfx-blendermedia-gfx/blender ndof
Before the version 2.65, the use flag to enable SpaceNavigator support was named "3dmouse". The use flag was only renamed after the version 2.64a of blender.
To get 3D mouse working properly you will need spacenavd.
root #emerge --ask app-misc/spacenavdAfter installing spacenavd you could check out the following file before starting anything, normally default values works for everyone.
/etc/spnavrc# This is an example configuration file for spacenavd. Uncomment and change
# any settings you need and copy it to /etc/spnavrc.
#
# Note that it's much easier to configure sensitivities and figure out axis
# reversals by using the interactive configure utility "spnavcfg", which lets
# you fiddle with all the settings and see the result immediately.
#
# Lines that start with a `#' are comments, and are ignored by spacenavd.
# Sensitivity is multiplied with every motion (1.0 normal).
#sensitivity = 1.0
# Separate sensitivity for rotation and translation.
#sensitivity-translation = 1.0
#sensitivity-rotation = 1.0
# Dead zone; any motion less than this number is discarded as noise.
#dead-zone = 2
# Selectively invert translation and rotation axes. Valid values are
# combinations of the letters x, y, and z.
#invert-rot = yz
#invert-trans = yz
# Swap Y and Z axes
#swap-yz = false
# Serial device
# Set this only if you have a serial device, and make sure you specify the
# correct device file. If you do set this option, any USB devices will be
# ignored!
#serial = /dev/ttyS0
# Enable/disable LED light (for devices that have one).
#led = on
When finished you can start the spacenavd with
root #/etc/init.d/spacenavd startor with systemd
root #systemctl start spacenavdAnd add it to start up as default with
root #/sbin/rc-update add spacenavd defaultor with systemd
root #systemctl enable spacenavdYou could also make udev start the daemon for you when a SpaceNavigator is plugged in:
root #ln -s 99-space-navigator.rules.ignored /etc/udev/rules.d/99-space-navigator.rulesspacenavd runs as the root user and must connect to the X server. Authentication is done via the MIT-MAGIC-COOKIE mechanism, consequently spacenavd must know about the cookie stored in the user's ~/.Xauthority file. One way to do this is via the xauth command:
root #xauth -f /home/ta/.Xauthority extract - :0 | xauth -f /root/.Xauthority merge -Also see the # 10 in the spacenavd FAQ :
If everything worked correctly you should now have a working device in blender (it must be emerge with ndof useflag, or 3dmouse for older version).
Alternative x11 events
By default, the spacenavd daemon use the uevent mechanism but can alternatively use x11 socket to handle events. Most of the time, uevents should be enough to use the 3D mouse in supported applications but Xevents has one advantage, it's capable of handle proprietary driver protocol Magellan. But if your application doesn't run on top of X proprietary driver is useless. More information on What's wrong with the proprietary driver ? or What is provided by the spacenav project?, read the official FAQ (see links following).
If you want to use X events support, you must enable it with the X use flag on build time and the spacenavd daemon must be notified of this new protocol with
root # spnavd_ctl x11 start To start generating Spacenav X events by default you should add this command in your user startup scripts such as ~/.gnomerc or ~/.xinitrc .
Those protocols aren't exclusive, both protocols can be build together, programs that choose to use the X11 protocol, are automatically compatible with either the free spacenavd driver or the proprietary driver.
Extra
Optionally you can add the following ebuild to configure dynamically the spacenavd.
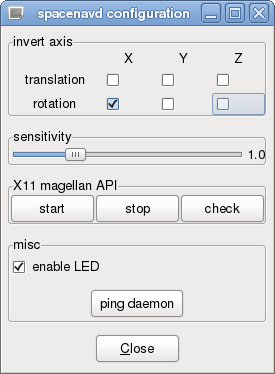
root #emerge --ask x11-misc/spnavcfgroot #/etc/init.d/spacenavd startuser $spnavcfgThe changes are immediately transmit to the spacenavd daemon that modify its behavior as requested.
More information on the daemon could be find in the log file /var/log/spnavd.log.
External resources
- Website of spacenav tools at SourceForge (libspnav, spacenavd, spnavcfg and other)
- Official spacenav FAQ


