Ardour
Ardour is a professional grade, multiplatform, digital audio workstation, and hard disk recorder.
Installation
USE flags
USE flags for media-sound/ardour Digital Audio Workstation
doc
|
Add extra documentation (API, Javadoc, etc). It is recommended to enable per package instead of globally |
jack
|
Add support for the JACK Audio Connection Kit |
nls
|
Add Native Language Support (using gettext - GNU locale utilities) |
phonehome
|
contact ardour.org at startup for new announcements |
pulseaudio
|
Add sound server support via media-libs/libpulse (may be PulseAudio or PipeWire) |
Emerge
Install Ardour:
root #emerge --ask media-sound/ardourAdditional software
JACK is a good audio backend choice for working with Ardour. To use Ardour with JACK, make sure it is properly installed and working.
See the article on music production for software to use in conjunction with Ardour.
Usage
This section aims to provide basic Ardour usage information, to get started recording and editing audio for novice users.
Invocation
Ardour should be found in the desktop environment menu under "Multimedia". It may also be started with the ardour6 command:
user $ardour6 --helpCreating a session
When starting Ardour, it will show a "Session Setup" dialog (this may be obstructed by the splash screen, use the taskbar to bring the dialog forward, or Alt+click the window to move it). A session stores the Ardour state and Data for a project. Click the "New session" button at the top of the dialog to follow on with this article, otherwise a pre-existing session may be opened.
In the next "Session setup" dialog, select a session template depending on the work planned - to follow on with this article, select "Recording session". The session can be given a descriptive name, and the location to save the files can be chosen. Click "Open" once everything is correctly selected.
In the next ("Audio/MIDI setup") dialog, configure the audio setup. To follow the rest of this article, select JACK, which is a good choice for audio quality, latency, and flexibility - JACK must be properly installed and configured, and the global "jack" USE flag should probably be set. Choose the sound device (with jack, all inputs and outputs necessary should be on the same device). Change any other parameters necessary, though the defaults will probably be fine. When done, click "Start" to launch JACK (if it is not already running, and if "Autostart" was left enabled), and open the main Ardour windows.
A "Template setup" dialog will pop up, proposing to create one or more new (audio) tracks. If only MIDI tracks are required, click "cancel" in this dialog.
Screenshots
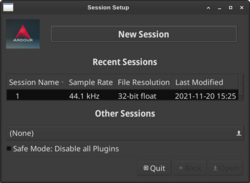
Session setup dialog.
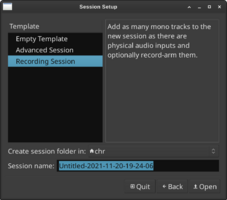
Second session setup dialog.
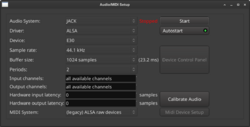
Audio/MIDI setup dialog.
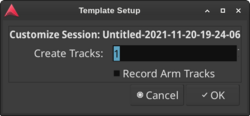
Template setup dialog.


Quick start to MIDI recording


To record a MIDI track, click the large "Rec" (text) button at the top right of the main window (or in the menu: "Window->Recorder->Show Recorder"), to show the recorder pane. To add a MIDI track, in the menu, click "Track->Add Track, Bus or Vca", then select the "MIDI tracks" tab on the left of the new window. Select an instrument from the list in this "Add Track/Bus/VCA" dialog, such as the "ACE Reasonable Synth" which is provided with Ardour (other instruments should be available if they are installed as plugins).
If a physical MIDI instrument, such as a keyboard, is correctly set up with ALSA, it should now play by default, with audio output. If not, the connection managers from the "Window" menu may help: "MIDI Connections", "Audio Connections", and "Tracks and busses". The media-sound/qjackctl or media-sound/vmpk packages may also be of use.
To record, once an instrument is working, the track must first be "armed" by clicking on the button with the red circle to the left of the newly added track line. This will not start recording, it just marks this track for recording to.
Next, arm Ardour for recording by clicking the button with the red circle in the transport group at the top left of the main window. This will not start recording either - the button will flash, and Ardour is "armed" to start recording.
Now, to actually start recording, either press the "play" button to the left of the Ardour "arm recording" button, or press space. To stop, press the "stop" button to the left of the Ardour "arm recording" button, or press space. Be aware that stopping recording will "disarm" Ardour, so be sure to "re-arm" to record again. Also note that pressing the Ardour record button during recording will halt input, but will not stop the transport.
See also
- Music production — Gentoo can be a good platform for music production.
External references
Instruments for Use with Ardour 3 - some suggested instruments to play sound into Ardour.